Wednesday, July 30, 2008

Adventures in Steampunk Spinning (Painting My Wheel)

UPDATED-


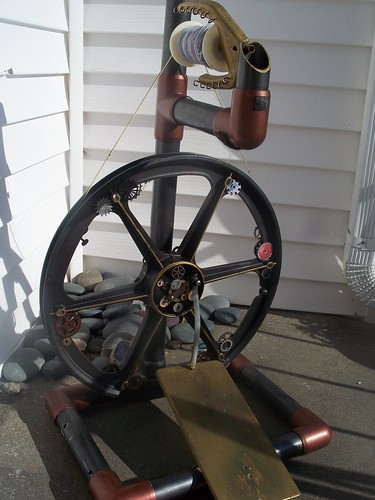
After spinning my first skein of yarn on my new Babe's Spinning Wheel, I realized that the white PVC pipe "look" would simply not do. So I headed down to my local store to pick up some paint supplies to customize it. I got copper, gold, and bronze acrylic paint, along with metallic gun metal and black spray paint for plastics, and a satin top coat.


After roughing up the surface with sandpaper, I coated the whole thing in black. Then I sprayed the gun metal color. After that dried, I highlighted the joints with the copper acrylic on the joints and gold highlights throughout.


I contemplated staining the foot pedal and flyer, but I can't to afford all those supplies. So, I painted them in the bronze/gold acrylic paints, which came out beautifully. It's very steampunk inspired, and yet it matches my other house accessories wonderfully. It's now not an eye sore in the living room, and I love it!


UPDATED 6/20/2009
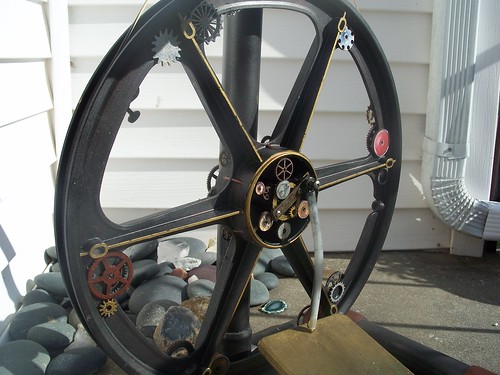
I got some gears from an Etsy store and glued them on. They are so cool!

Sunday, July 27, 2008

Fiber Christmas in July Festival


I had the pleasure of attending the Fiber Christmas in July Festival in Kellyville, OK! My Mil picked me up and we headed out together Saturday and arrived at the Fairgrounds around 12:30. Since it was only the second time they have had it, it wasn't very large, but about what I expected. The first thing I noticed when I walked in was all the spinning wheels everywhere! So salivating, I started walking around the booths. The first booth was manned by two delightful women selling roving and spinning material. They were very helpful in deciding what to buy without being pushy or know-it-all. You can find some of their stash at Weavery at Indian Meridian.


Then we looked around at the other booths. We found the woman who raises Alpacas in Oklahoma that we had seen at L&B Yarn Co last year who was selling more roving and yarn. She had more variety this year that was fun to see. I believe her website is Kindred Spirits.

There were also many non yarn booths which included baskets and odds and ends that were very interesting. We happened by the above doll at on of those booths. He reminded me of Carrot Top in a tuxedo. I also ran into Dark Twist from whom I purchased my Top Hat pattern from. Though I didn't realize it was her until I got home. It's always fun to meet the person behind the online persona.


And by the end of the day, a woman at one booth informed us of a spinning wheel that was for sell at a great price! I was so excited, but tried not to get my hopes too high. Naturally, one of the wooden beauties would be the epitome of a spinners dream, but I just wanted something to start with. So we got me a spinning wheel for $110 dollars plus some bobbins! I know it's not the prettiest thing, but I hope to rectify that by painting it. I tried spinning some when I got how and did fairly well considering I had never touched a spinning wheel in my life!

So our haul in the end was 6 skeins of yarn, 4 different types of roving to experiment with, a great spinning wheel, and a Niddy Noddy. But most of all, I had a great time meeting people, talking, and hanging out with my Mil.

Thursday, July 24, 2008

Steampunk Weaponry


(If you can think of a great name to write on the side of it, please let me know!)


Today, I worked on the pistol of the costume I'm designing. I found online, where a man was taking Nerf guns, and painting them up to look like ray guns. There was no way I was going to spend $40-50 for it when all I needed was some paint. So, after visiting my son's toy box, I found a water gun that was broken. (Repeat it with me, "Recycle, Reuse, RENEW" courtesy of The Little People also from my son's movie collection) I knew there was a reason I hadn't thrown it away! So after getting some metallic paints, and decorating, I have a fancy new toy to go along with my Air Pirate persona!


Now I know many people out there are wondering, "Why is this crazy girl doing this?". Well, it's simple, some people collect coins, some collect teapots, or roosters or even Mickey Mouse. I love to create things. Whether it be knit, crochet, paint, steel, or something that nobody has even named yet. I pride myself on being good at things that most others wouldn't even thought possible. It's a passion! So instead of asking me why, ask yourself, "What are you passionate about?"


Wednesday, July 23, 2008

Tie Me Up Spats


While designing a Steam punk outfit for a special event, I came up with this pattern for some Victorian inspired spats to accommodate my vision. I feel that if a pattern is this easy, it should be free!

Simply add your own personal touches to make it yours!

Finished Size:
12 inches around top, 15 inches around bottom edge, and 7 inches tall

Materials:
Red Heart Super Saver Yarn, 150yards
Size I crochet hook
Ribbon
Needle for sewing in ends

Pattern notes:
Half Double Crochet (hdc)- Yarn over hook, insert hook in stitch, yarn over hook, pull a loop through the stitch, yarn over hook, pull yarn through all three loops on the hook.

Pattern:
Ch 36, turn.
Ch 2, hdc across, turn.

*Ch 2, hdc 1, Ch 1, skip 1, hdc across to last three sts, Ch 1, skip 1, hdc last two sts, turn.
Ch 2, hdc across. *
Repeat from * 4 more times.


*Ch 2, hdc 1, ch 1, skip 1, 2 hdc in next st, hdc across to the last four sts, 2 hdc in next st, ch 1, skip 1, hdc last two sts, turn.
Ch 2, hdc 1, 2 hdc in next st, hdc across to last three sts, 2 hdc next st, hdc in last two sts.*
Repeat last town rows from * 2 more times. BO and weave in ends.

Lace ribbon through ch1 spaces like a shoe.


Note: To make taller, repeat between the first two *'s until it reaches desired length.

Copyright 2008. Dawn L.E. Riden. All rights reserved. For personal use only. Not for commercial sale.

Tuesday, July 15, 2008

Circumvenio Bracelet


From the latin word meaning "to come around", this bracelet was a beginning of a journey into the world of rings. From scrapes of stainless steel rings to fantastic bracelets!

My husband and I make our own chainmaille rings for various projects. Unfortunately, not all rings are the same, and we have a discarded or "dead" pile of rings that have accumulated over time. I cannot stand to see anything go to waste. So was born the Circumvenio bracelet!

Finished Size: 9 inches around

Materials:
Aunt Lydia's Fashion Crochet Thread
Size D/3.25 mm crochet hook
5/8" steel ring (you could also try the little plastic ones sold at the store)

Pattern:
Starting with a closed ring, hook and pull yarn through center of ring, YO, pull through loop. (Now, yarn is attached to ring.)
Sc half way around the ring.
Add second ring by inserting hook through ring, YO, pull through center of ring, YO, and pull through both loops.
Sc half way around ring again.
Continue adding rings until you get to a length that will fit around your wrist.

The yarn will give some wiggle room when you close the circle, but make sure it's snug enough to still stay on.
When you get the bracelet to the desired length, connect the first ring to the last using the previous method.

Finish the other half of the bracelet by sc the other half and joining to the next ring, thus reinforcing the joins.

When you reach the end, break yarn, and weave in ends, and "Presto!".

Copyright 2008. Dawn L. E. Riden. All rights reserved. For personal use only. Not for Commercial sale.

Monday, July 14, 2008

Winding up

I've worked up a pattern for a matching necklace to my chocker. BUT, I don't have any pictures yet to post. SO until I get that squared away, I'm keeping the pattern to myself. WhaaaHAaa Haaa!!!


I've been working lately on a beautiful shrug out of the Twinkles Big City Knits book. I would have it done by now, but I got frustrated when I tried it on and it seemed small. I gave into my frustration by putting it in timeout in the back of the stash. I think I've forgiven it, though, and plan to finish it within the next day. I've also decided to join the knitting olympics by completing a couple of projects within a two week period. So here's the swatch for a fun sweater (my first!).

On a side note, I want to give you all a laugh (because I do every time I see it) by introducing you to my Grandmother's bathroom. I always think of Austin Powers when I try to use it!

Friday, July 11, 2008

Katya Choker

Finished Size: 12 inches long X 1 inch wide

This was actually inspired by a good friend of mine who sometimes wears a ribbon for a necklace. It's simple and elegant and says so much about the person wearing it.

Materials
Yarn: Aunt Lydia's Fashion Crochet Thread (size 3)
Hook: Size D/3-3.25 mm or size needed to obtain gauge
Notions: Sewing needle, ribbon (1/2")

Special Stitches (US):
Single crochet (Sc): Insert hook into indicated stitch, yarn over and then draw up through loop. There are now two loops on you hook. Yarn over and draw yarn through both loops on your hook. Single Crochet complete.
Treble Crochet (Tr): Yarn over hook twice, then insert hook into next stitch.
Yarn over hook and draw yarn through stitch. There are four loops on the hook.
Loop yarn over hook and draw through two loops There are now three loops remaining on the hook. Yarn over hook and draw through two loops. Again, loop yarn over hook and draw through the last two loops on the hook. There is now one loop remaining.
This completes one treble crochet.
Shell st: Single crochet (sc), then skip two chains and double crochet (dc) into third stitch 8 times (fan made). Skip the next 2 stitches, and sc into third stitch.

Pattern:
Chain 72
Ch 1, sc across (72 total)
Ch 4 (counts as first treble, ch1), tr in 6th st from hook,*ch1, sk 1, tr,* repeat from *
Ch 1, sc across
Skip 2, 8 dc in third stitch from hook, *shell*, repeat across (12 shells).
Bind off and weave in ends.

Block and weave ribbon in and out through treble chains. Make sure you cut the ribbon long enough to go around your neck and tie into a bow.

copyright 2008 Dawn L.E. Riden, all rights reserved. For personal and private use only. Not for commercial sale.