Saturday, March 21, 2009

Illustrious Purse Pattern


Embellishing handbags to fit your personal style transforms a simple bag into a wearable art. This purse all started with a button. My brother-in-law bought me a beautiful new jacket as a present, and attached along with it, a stunning multifaceted button.

I retain a collection of buttons and beads from numerous sources hidden away in my sewing supplies. They only see the light of day when I open the box to add a new button or a new bead. I could not, however, add this cherished button to the forgotten button stash.

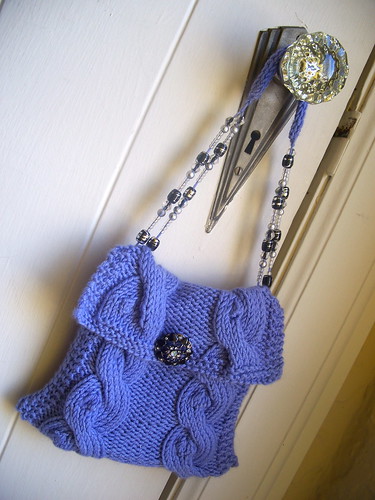
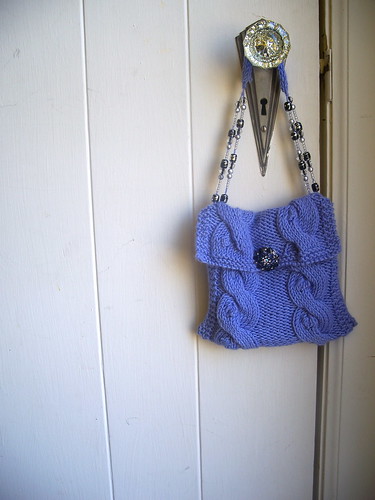
Pulling out a luxurious silk/cashmere yarn, I designed this shoulder bag to showcase the buttons beauty. With its simple rectangular construction and cable/bobble lines, it will easily highlight your treasure as well. Beaded handles add depth, and they are as easy to create as the bag itself. Its beauty can only be enhanced by your imagination!


SIZE
One Size

FINISHED MEASUREMENTS
Width: 6.5 inches
Length: 6.5 inches

MATERIALS
Laines Du Laines Cashsilk [50% merino, 25% silk, 25 % cashmere]; 67yd per 25g skein]; color: Partita; 2 skeins

1 set US 8/5mm straight needles
1 set US 8/5mm double point needles
Cable needle
1 – ¾-inch button
Beads with large center hole (Fashion Glass #3123005 used in photo)
Tapestry Needle
.25 yrds fabric for lining
Sewing needle
Thread to match yarn and lining

GAUGE
24 sts/18 rows = 4" in stockinette stitch

PATTERN NOTES
C10F: sl 5 sts onto the cn and hold in front of work, k5 and, k5 from cn.
Bobble Increase: K into front, then back, then front, then back, then front again of next st: 1 st increased to 5 sts.
Bobble Decrease: P5tog. 5 sts decreased to 1 st.

PATTERN

Bag:
CO 29 sts.

Rows 1-6: K
Row 7: K2, p10, k5 , p10, k2
Row 8: K2, k10, p5, k10, k2
Row 9: K2, p10, k3, YO, k2, p10, k2 (30 stitches)

Beginning on row 3 of following pattern, work 8 pattern repeats.

Pattern:
Row 1: K2, p10, K6, p10, K2
Row 2: P2, K10, p6, K10, p2
Row 3: K2, p10, K6, p10, K2
Row 4: P2, K2, Bbl Inc, K7, p6, K10, p2
Row 5: K2, C10F, K6, K14, p2
Row 6: P2, K2, Bbl Dec, K7, p6, K10, p2
Row 7: K2, p10, K6, p10, K2
Row 8: P2, K10, p6, K10, p2
Row 9: K2, p10, K6, p10, K2
Row 10: P2, K10, p6, K2, Bbl Inc, K7, p2
Row 11: K2, p14, K6, C10F, K2
Row 12: P2, K10, p6, K2, Bbl Dec, K7, P10

Knit 8 rows. BO and weave in ends.


I-cord Handle
CO 4 stitches using double pointed needles. Knit across. Instead of turning, slip the stitches back to the beginning of the needle and knit the row again. As you pull the i-cord straight, the gap on the back will tighten up and close.

Continue in this manner until it is 6 inches. Cut yarn leaving 8-inch tail, and thread the yarn through the stitches and pull firmly.

Cut one 24-inch length of yarn. Thread through the middle of the i-cord. Now you will have an i-cord with two strands of yarn on the ends. Tie a knot to secure the tails to the i-cord.

The beads are packaged on a plastic wire to ensure easy transfer to your project. Simply, tie the bead wire to the yarn, and slide beads from the wire to the yarn handle.


FINISHING
Fold 5 inches of bottom up and seam sides.

Attach the i-cord handle by spreading out the two strands and threading them through the top of the purse and tying a knot. Repeat on other side.

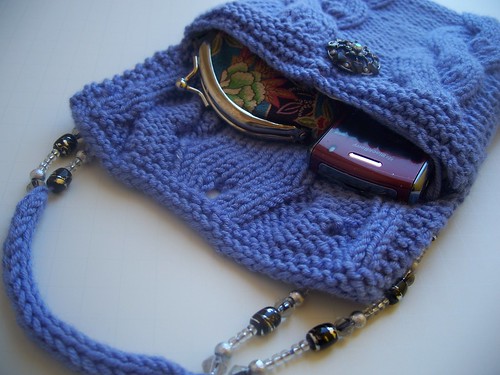
For the lining, cut a 6-inches by 12 inches rectangle from lining fabric. Fold fabric in half lengthwise, and sew 6 inches of each long edge of rectangle, beginning at fold.

Fold over 0.5 inch of the top edges of lining and press. To hide the ends of the handle, slip fabric pocket with wrong sides facing out inside the purse, covering the strap knots and sew around the top. Attach button to front of purse.


Copyright 2009. Dawn L.E. Riden. hese patterns are for personal and non-profit use only. You may not sell items made from these patterns. You may make them for yourself, as gifts, or for donation to charity sales or auctions. And these patterns love being used for knitalongs or other organized knitting events that are free of charge.

Merchants may not download or print these patterns for sale, free distribution, or class use without prior written permission from the author. If you received one of these patterns directly from a yarn store, or are taking a paid class using one of these patterns , please verify that the store has written permission from the author.

Printing or downloading a pattern constitutes agreement with these terms.

Thursday, March 5, 2009

Phat Fiber

In case you haven't known, I've been busy these past couple of weeks getting things together for the Phat Fiber box. I've been spinning and packaging and mailing and everything in between getting everything done in time. February's box was a wonderful collection of fibers, yarns, and other odds and ends that tickled my imagination on the stuff I would like to make. Just in case you missed it, here's my box.


Now, for the first month I will be submitting, I wanted to do something special. I normally wouldn't send in sample that take me so long to make. 45 of them none the less! But I wanted everyone to get something special for the first time. So I made shawl pins that were Celtic themed for everyone.

It took time and patience, and I smashed my fingers a couple of times, but I think everyone will appreciate their treats.

If you would like to purchase one of my creations, you can check my Etsy store out at DawningDreams.Etsy.com.

OR

If you would like to get a Phat Box of your own, you can get it at PhatFiber.Etsy.com.

Tuesday, February 24, 2009

Row Counting Rendezvous

As many of you may know, I have an Esty store called Dawning Dreams Etsy Shop. I sell knitting, spinning, & crochet yarn and accessories. Many of the items you see are the final products of several endeavors to make a great product. You should see the pile of dead stitch markers I have in a jar that didn't make the cut.

Recently, I decided to take on the task of creating a row counter. There are several types available online, and I felt it was my duty not to copy another design, but to create a unique type from scratch.

There's a beautiful sock row counter made in metal rings and beads. It's visually appealing and sells. Unfortunately, I don't like that it's tiny. I have trouble sliding the rubber o-ring around. Making a bigger version would look funny to me. It would be more like a necklace than a counter.

There's another popular type that is a bracelet. Once again, very eye appealing and a great seller. To me though, there are too many parts. I wanted something easier to create. I like simplicity.

I started searching then over the web for different types of Abacus counting systems that aren't necessarily related to knitting. So were fantastically ornate, so simple and not practical.

I finally ended on a design like this.. .


They are different than all those I've seen with beads that slide back and forth, and therein lies the problem. The string used must be sturdy enough to last though multiple slides without breaking. I made three versions of the counter: one with crochet thread, one with fishing line, and one with jewelry wire.

Next was the fun part, I took all three and played with them. I slid the beads around, swung it in circles, and gave it to the kids. For a couple of hours everyday I played with them.

After beating them up sufficiently I checked them over to see how well they stood up to the abuse. The wire one was very stiff and pushed the beads crookedly. (Like the top sample.) Also, the wire broke relatively easy and frayed. Not good.

The Fishing line worked out better. It was fine with the abuse, but the beads didn't slide easily, and as you can see in the photo, the beads didn't lie straight.

The crochet thread was the best in my opinion. It hanged nicely and felt good in my hands. There was some wear on the string, but it didn't break. It did stretch a little, but not so much as to compromise the workings of the mechanism.

So, in the end, I choose number three, and need to start making them.

Next time you look around my store, think about all the things that you don't see me doing to make sure you get a good product. It's not always about finding the cheapest stuff, but the best constructed. I love what I do, and I hope you all love it too.

Friday, February 20, 2009

Ribbed Lip Balm Holder


SIZE
One Size

FINISHED MEASUREMENTS
Length: 3 inches

MATERIALS
Leftover scraps of sock yarn
1 set US size 0 double point needles
Tapestry Needle


PATTERN
Cast on 3 sts.
Work I-cord for two (2) inches.
Cast-on 15 more sts using knitted cast-on and join round. (18 sts)
Divide onto three (3) double point needles to begin working in the round.
Work three (3) rounds of stockinette st.
On fourth round, begin 2X2 ribbing by k2, p2. You will end with a ridge of 4 knit sts on the back of the tube. (If you don't want a 4 st ridge you can K3,P3 around. I like the ridge on my fingers)
Work in this pattern for another two (2) inches.
Knit one round.
K2tog around. (9 sts)
K2tog around, then knit last st. (5 sts)
Break yarn leaving 8" tail and weave tail through live loops. Pull tail tightly to close hole, and weave in all ends.

To form loop on top fold i-cord down and use the tail to attach the top of the cord to the bottom where the tube starts. You can make it fit a belt by making the i-cord longer.

Enjoy!


Copyright 2009. Dawn L.E. Riden. These patterns are for personal and non-profit use only. You may not sell items made from these patterns. You may make them for yourself, as gifts, or for donation to charity sales or auctions. And these patterns love being used for knitalongs or other organized knitting events that are free of charge.

Merchants may not download or print these patterns for sale, free distribution, or class use without prior written permission from the author . If you received one of these patterns directly from a yarn store, or are taking a paid class using one of these patterns, please verify that the store has written permission from the author.

Printing or downloading a pattern constitutes agreement with these terms.

Sunday, February 15, 2009

A Sleeping Spindle Treasure


Phat Fiber, who brings together wonderful sampler boxes full of items from independent fiber, yarn, and related artisans, host several give-aways during the month. I must be on a streak of good luck because I was drawn to receive a wonder bag for my fiber and spindle from The Sleeping Spindle on Etsy.

I love the funky mod fabric of the spindle bag that is cut longer, so it can fit wool and a spindle. She also included a delightful sample of some of her green and blue wool, Lauchlann, as well as a smaller bag that is perfect for storing little items in. She, of course, has several choices of fabric to choose from. So check her out!

Thank you so much!

Thursday, February 12, 2009

Creation From My Heart Treats

Recently, I participated in the Sassy Flirty Apron Swap themed "Sugar & Spice and Everything Nice". Through the swap , I had won a drawing for a delightful teacup pincushion & glove set from Creations From My Heart Etsy Shop. Of course I was overjoyed to have won something, but when the set came in I was stunned with the beauty and quality of the pieces.

The teacup is simply perfect with the lace trim & polka dot fabric. It is now sitting right next to my sewing machine, just waiting to be used. And the gloves. . . the gloves really make cleaning not a chore, but a pleasure. I don't feel frumpy with these babies on! I love the Victorian feel to everything, seeing as how I love steampunk.

You can visit her at her blog where she has other inspiring creations from her heart at Creation From My Heart Blog.

Monday, December 15, 2008

Socks


I finally decided to tackle socks. I have long questioned the popularity of sock making in the knitting community. It seemed like a lot of work for something you can go buy at the store for less than a dollar. Most of the opinions that I've heard are that they are portable and easy to knit. Mindless knitting was actually the term used.

So, I looked for a basic pattern to begin with, and I found Basic Ribbed Socks by Kate Atherly on Ravelry. The general consensus was that this was a great pattern to start with. The ribbing allows a great fit without being a mind-numbing K2P2 ribbing.

After getting the first sock most of the way done, I realized that I was going to need a sock blocker to make sure both of my socks wind up the same size. Being a frugal mother, I decided to make my own. I found a great DIY tutorial for Super Easy DIY Sock Blockers on Little Seasame Knits by Maryann that outlined how to make your own for a dollar. Unlike some tutorials, it actually proved to be right. Without the cost of scissors and paper, it actually only cost me a dollar!


I am now done with the first sock, and it's on my special homemade blocker. (Very exciting!) I am not enthralled with the process as some people, but I can see its uses. Lord knows I have a lot of sock yarn around. I love the way it feels and looks.

I hope this may inspire some of you to give sock knitting a try. Who knows, you may love it and want to knit all of your family members socks for next Christmas!