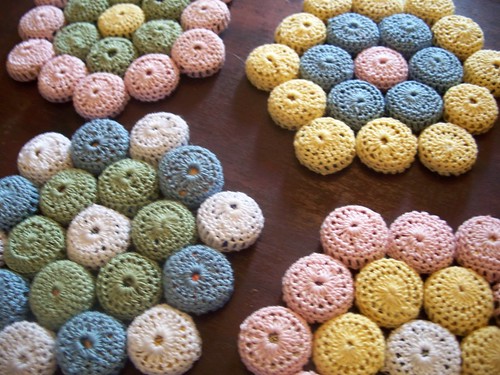
Wednesday, July 29, 2009

Tour De Fleece Finish Line

Well, it's all over! How did you all do? I didn't do too much crazy outlandish yarns. I mainly worked on lace weight for a shawl I want to create.

It's funny how I can spin 175 yard of a worsted in 2 hours, but it takes 24 total hours to spin 1200 yards of lace. I don't think people realize just how much more time goes into the finer yarns when you compare the two side by side, which is mainly the reason you don't see a whole lot of handspun lace on Etsy or Artfire. It just is too costly to sell, and no one will buy it. Sad, but true.

So, to tally it up, I have:
Here's the end of a wonderful spinning month.
Art Yarn for BKG (176 yards)


Finally Finishing lace (344 yards)


And finally my peacock shawl lace (~1200 yards singles)

Sunday, July 26, 2009

Christmas In July Fiber Festival 2009


I had a wonderful time at the festival. Thank you everyone who had been there for making it such a positive and creative environment.

With the variety of fibers from raw fleeces to hand dyed silk caps, I loved perusing the tables and talking to everyone. I picked up some major deals as well! I finally have my own loom to learn how to weave, although I had told myself not to get sucked in just yet. However, the price was right as well as the person.


I also promised that I wouldn't buy much. Well, let me just say that there was a sale of $4 for a pound of yarn, no matter what the type. After several minutes of digging, I actually walked out with 8 lbs of yarn. I know, I'm so bad. : (


Oh! Have you seen the alpaca fleeces?!


I was also excited to get to finally take a class by Nancy Barnett on Angora Rabbits. We were able to get to spin all four different varieties of bunny fiber in one sitting! I got to work on German, French, English, and Satin. You can see the different varieties on my bobbin here (bottom white is German and middle is Champagne French). Now, I just need to find a bunny just for me!


If you haven't ever been to a fiber festival, such as this, I think you should take a road trip to one sometime. I'm sure you won't be disappointed. : )

Saturday, July 18, 2009

Bamboo Dye Day


My friends always laugh about my the knowledge my children have of fibers and fiber animals. Truthfully, they can't but absorb the different types and textures with the abundance of textiles in my home.


Today, I introduced them into the world of dyeing. We worked on my favorite fiber, bamboo. I love the silky feel of bamboo and it's drape when spun. It's like silk of the plant world. Many spinner's are afraid to try it because of how slippery it can be. Yes, it isn't as catchy as wool, but I actually can spin it faster because of how it slides through my fingers. If you haven't tried it, you should.

Wednesday, July 1, 2009

Tour De Fleece with Dawning Dreams

Well, the Tour De France begins soon, and being spinning lovers, a spinning challege has been created to support, in our own way, the bicyclist who work hard during their journey.


The Tour de Fleece, which began in 2006, is continuing this year. I'm happily joining the ranks to represent Team Phat Fiber and Team Bad Knit Girls on Ravelry. I plan to do some Art Yarns and finish my lace that I've been working on.

As a way to show my support, I am offering a discount on my Etsy store. When you purchase one item, you get one 50% off of equal or lesser value through July 15th. Enter code: Tour de Fleece at checkout.

Etsy
Buy Handmade
DawningDreams

Thursday, June 25, 2009

July Phat Sample Peek


For July, we all all going non-wool. So no fluffy BFL batts or Merino lovelies, but this time around we are sending in cottons, silks, alpacas, and angoras. I'm very excited about what treasures and sensations will be up for grabs in this assortment.

For my samples, I revisited my knit jewelry. I actually made the samples themselves about a month ago. They have been sitting in my desk awaiting the proper adornment for their trip around the world. (Yes, lots of the Phat Boxes find their way overseas. Isn't that great!)

I finally saw these little boxes for wedding favors at the store. They were perfect for putting my pins in. Unfortunately, I did not spend the money to buy them there. I didn't partially because I was on vacation, and didn't want to tote around the buggers for the remainder of the trip.

Boy, I feel like an idiot now. I looked online at the cost of purchasing the little favor boxes. Outrageous! The boxes cost more than I thought they would. So, being the crafty individual I am, I grabbed a stack of stock paper and a template, and I cut out and folded 50 little cute boxes. It took 4 hours to get everyone of them finished. When I had finally packed my goodies in a mailing box along with a batt, I was exhausted. I'm surprised I didn't get a paper cut!

So here they are! Someone will receive one of these designs in their box. Now, don't be upset if you don't wear shawls. I get that sentiment a lot, "Aww, they're pretty, but I don't wear shawls." The beauty of these is that they can be worn many, many different ways. Pin it to the front of a cardigan to keep it closed, use it as a accessory on a purse, pin it to a winter knit hat. . . the uses are endless!


So, if any one you get one of my beauties, I love to see a picture of it in action. You can post here with a link or on my Ravelery group at http://www.ravelry.com/groups/dawning-dreams-devotees

Thank you!

Friday, June 19, 2009

Bottle Cap Hot Pad Pattern


Beer Cap Hot Pad
by Dawn L.E. Riden


I originally made several of these for a vintage crochet potholder swap. They were such a huge hit, I decided to write down the pattern to share with everyone.


SIZE
6.5 inches across

MATERIALS
Aunt Lydia's Classic Crochet (Size 10); need approximately 75 yards
Size 9/1.40MM crochet hook
19 beer caps of your choice
Sewing needle

GAUGE
24 dc/12 rows = 4" in stockinette stitch

PATTERN NOTES
Ch = Chain
Dc = Double Crochet
Sc = Single Crochet
Sc Dec = Single Crochet Decrease (Insert hook in first stitch indicated, yo, pull up loop, insert hook in second stitch indicated, yo, pull up loop, yo, pull through remaining 3 loops on hook.)
Sl St = Slip Stitch


PATTERN
Cap Cover

Ch 5, slst to first stitch to join.
Ch 3, 15 dc in ring, slst to join at top of ch 3. Make sure to dc over the tail of the chain to hide it. (16 dc)
Ch 2, sc in same st, *1 sc the next three sts, 2 sc in next st*, repeat between * two more times, sc 3, slst with top of Beg ch to join (20 sts)
Ch 2, sc in every st around, slst with top of Beg ch to join. (20 sts)
Ch 3, dc in every st around, slst with top of Beg ch to join. (20 sts)
Insert bottle cap before decreasing. 
Sc Dec around, slst with top of Beg ch to join (10 sts)
Sc dec around, slst with top of Beg ch to join (5 sts)
Break thread and weave through remaining 5 loops, tie closed and weave in ends.

FINISHING

Using scrap crochet cotton, sew 6 cover caps around one central cap on the underneath side where they touch. Then join 12 covered caps around the six. You can mix and match color however you like, so use you imagination!


ABOUT THE DESIGNER
Dawn is an energetic doting mother of 3, loving wife of 1, and friend to many. She enjoys creating unique designs using wire, yarn, and fabrics. To learn more about her and her inspiration, check her out on her blog at: www.dawningdreamsblog.blogspot.com
You can also support her habit by checking out her online store at:
www.dawningdreams.etsy.com


Copyright 2009. Dawn L.E. Riden. hese patterns are for personal and non-profit use only. You may not sell items made from these patterns. You may make them for yourself, as gifts, or for donation to charity sales or auctions. And these patterns love being used for knitalongs or other organized knitting events that are free of charge.

Merchants may not download or print these patterns for sale, free distribution, or class use without prior written permission from the author. If you received one of these patterns directly from a yarn store, or are taking a paid class using one of these patterns, please verify that the store has written permission from the author.
Printing or downloading a pattern constitutes agreement with these terms.

Thursday, April 23, 2009

Made Well Co. Vintage Drum Carder


Here she is. My vintage Made Well Drum Carder from Sifton, Manitoba, Canada that I bought from a nice person on Ebay who had purchased it from an antique dealer in Canada. The antique dealer told them that it had been in Newfoundland, and was found in a old barn. I asked around on Ravelry to see if any one has information concerning this beauty. Luckily, my prayers were answered and here's what I learned about it's spinning wheels and such:

Quoted from info I have..Selected Canadian Spinning Wheels in Perspective by Judith Buxton-Keenlyside, 1980:
“The company was started during the depression by John Weselowski, it later became the Make-Well Manufacturing Company and was famous for it hand-operated drum carders as well as it’s wheels. Several of the stylistic features of this wheel were borrowed from the traditional Ukrainian wheels. Wheel and Flyer spindle are arranged vertically. The inner maiden bearing is a hole drilled in the wooden upright. Tensioning is accomplished by raising or lowering a tablet on the outer maiden. Hallmarks of the Spin-Well wheel include a solid drive wheel, pre-cast metal flyer, treadle-system using a fixed treadle bar, footman placement in front of the wheel and provision for extra bobbins.”
Here is a quote from a letter sent to my friend by Florence Feldman-Wood The Spinning Wheel Sleuth where she talks about info on this wheel from a man in Indiana who was in the business of repairing all types of spinning wheels, He states to her:
“These wheels were made in the 60’s and 70’d during the rebirth of the handspinning and weaving crafts. They are well built wheels made of maple and solid core maple plywood. At 27.00 they were prices well below the better New Zealand wheels which sold for 80 to 100 at the time I’ve had two in maple and one in walnut. Paula Simmons used their wheels.”

I also learned from the lady on Ravelry that Mr. Duncan on Duncan Drum Carder told her that this drum carder was the model for for Paula Simmon’s first husband who designed her drum carders as known as Patrick Green's Drum Carders. When you compare the two styles, you can see that they are very similar.


Now, I have not received my drum carding cloth, yet, from Howard Brush Company. As you can see, it is layered wooden wheels that have been glued together, very good construction. If you plan on restoring a carder, like I have, I found this to be the least costly approach. But, I warn you. it will be over $100 to replace worn cloth on both wheels, but compared to $350-$1600, it a steal. I had to replace the belt, as with most vintage carders. I found a lawn mower belt than was nearly the exact size I needed. I simple added a wooden cover to the large drum wheel, and it now works perfectly.

Now, a little disclaimer of sorts, I could be completely wrong, and all the information I have collected be false. I haven't found online sources to support these stories expect what I have been told from numerous people. So, if something here is completely and utterly false, let me know and I can change it. This blog is meant to inform others of the treasures they may also have hidden in their sheds and it's history.

ETA 12/20/2010: Pics of the relatively finished carder with new carding cloth and licker support blocks. Not pretty, but works like a dream.