Sunday, September 12, 2010

DawningDreams at Clarita Amish Auction 2010

Dawning Dreams FiberArts Booth

I want to say I really enjoyed this fair, but I really didn't. It was blistering hot first of all. We were there very early in the morning to open the tent up. By mid-morning, it was hot enough to seek shade. Then, many people would walk by announcing how difficult it must be for me. (I was usually either warping my loom or spinning.) I simply replied that everyone has something they enjoy that takes time and it wasn't work when I enjoyed it. I did speak to three really fun and interesting individuals about yarn and spinning and such.

Dawning Dreams FiberArts Booth

Hardly anyone stopped in to visit. When I finally walked around for a little, I found most of the other vendors there to be selling retail wot-not (like imported bed sheets, t-shirts, and garage sale stuff). It was definitely not welcoming to handmade items since everyone was looking for "a deal", and being handmade, I do not give that kind of deal.

Dawning Dreams FiberArts Booth

One couple was very sweet though. They really were the bright spot in my day. They told me they had saved my booth for last because they thought it was the best looking, and had the most fantastic handmade items. It gave me a boost in the middle of the day.

So if you want to go to this, be prepared for wonderful food, great auctioning, and garage sale finds. I'll probably just go next year to see if I can find goodies, but not to vend. Live and learn. . .

Thursday, August 12, 2010

DIY Raddle for Weaving Loom

HOW TO MAKE A RADDLE FOR A WEAVING LOOM


Raddle - An instrument consisting of a wooden bar, with a row of upright pegs set in it, used by domestic weavers to keep the warp of a proper width, and prevent tangling when it is wound upon the beam of the loom. [1913 Webster]


After warping my loom for the first time, I realized quickly that a raddle would be a very helpful tool. Unfortunately, I neither have the funds, nor the desire to purchase a $50 plus S/H raddle, when I can make my own.

The loom I have is an Ashford 32" 8 Shaft Table Loom. It's a beauty and a dream to work on (once I got it warped). The legth measurements I give or for my particular loom. To make it fit yours, simply measure the width and cut accordingly.


Materials:
1 1/2 inch Pine/Oak cut down to width of loom (34 1/2" for my Ashford)
3/4 Inch Dowel for Legs cut down to 2 1/4 length (optional)
Lots of 2" nails
Pencil
Measuring Tape


Directions:

1. Measure the space you would like your raddle to sit and cut. For my loom, it was 34 1/2".

2. Marking the center of the loom, place two parallel lines on either side. This is where you hammer in the nails. I use two lines to keep the close nails from splitting the wood.


3. On one line, make a 1/2 inch marks from the center out. On the other line, stagger the marks, and mark 1/2 inch again across the wood. This will give 1/4 inch gaps between front and back nails.


4. Now with your nail placement marked, start hammering in all those nails. I'm not very picky, so my nails aren't perfectly straight. It will still work. (Optional) I used different color nails to mark the center and every 4 inches out.


5. (Optional) Since I needed mine to see up higher to keep the warp from stretching over the top, and making it uneven, I added in 2 1/4" dowel legs on either side.


6. Finally finished! I put the raddle on my loom and I'm ready to go.


It know it's not pretty, but it works great. When I'm actually ready to use it, I tie it down using a couple of pieces of scrap yarn to keep it from moving.


Another method I've seen it to drill holes down the wood and set in wooden pegs. I didn't want to buy more than I needed to or waste time drilling all those holes. It can look prettier though, so it's your choice. I hope this helps one of you out there to make your own!


If you like this or any other DIY tutorials, feel free to donate directly to me using the link below. I truly appreciate anything you can offer to keep me creating. 

Thursday, August 5, 2010

5th Annual Fiber Christmas in July


Once again, I had the pleasure to attend Fiber Christmas in Kellyville, OK on July 30-31. I had a glorious time getting to hug all my fellow fiber artist that I hadn't seen recently, and to peruse their wares. This year was not disappointing at all!


There were fleeces, roving (both commercial and handdyed), yarns, spinning wheels of every major make and model. I even got to try a few like Spinolution's Hopper that you pedal with you heels inside of feet. It was really neat!


The positive environment was very geared towards learning and and sharing from one another. I had the pleasure to teach drop spinning to several attendees that picked it up amazingly quick. I have now saved up enough to purchase a new Ashford 8 shaft Table Loom! I thought I would never be able to afford one, but I've seriously saved up and with the help of my family, it will be delivered next week. So exciting!!

So if you haven't attended a Fiber Fair, and you play with yarn in one of it's glorious forms, you have to attend one and see just what your missing.


Monday, May 17, 2010

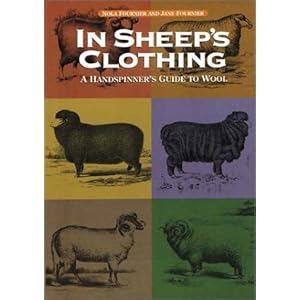
Book Review: "In Sheep's Clothing" by Nola and Jane Fournier


Now, this will be a break from my normal blogging in the respect that I rarely give my opinion on a book or tool. But I just had to share this book. I had been lusting over it for a while after seeing it on multiple occasions at fiber festivals throughout the state. Ever looking to learn, I finally picked this up on Amazon to study, and I am so glad I did!

I don't own sheep, nor do I live in a part of the country where sheep are raised for their wool. So, I find it difficult to compare the fleeces of animals. Rabbits, I have, sheep. . . no. The beauty of this book not only lies in the thorough knowledge of sheep, but actual photographs of the different breeds locks including characteristics and applications for their wool. For example, it'll tell you that this breed's wool is good to spin worsted style and knit for rugs.

After all this, it goes into preparing wools. Yes, you can YouTube many techniques, but sometimes a book that explains the "why" is what I'm looking for. Why do you hand card rather than drum card? Unlike other online sources, books must be edited to make sure that the information is accurate. It's not about an opinion as much as fact. Don't get me wrong, there are books based on opinion, but this is more like an encyclopedia.

Have I confused you yet? : ) Well, if you are a spinster like me, and really want a great book that will give you the in depth answers you seek, you must check this book out. It's a keeper!

Thursday, May 6, 2010

Um, yea, I've been a bad poster.


Well, it's been one of those crazy weeks of dyeing, drying, staining, painting, and carding. I went out to the Tulsa Spring Fiber Festival last weekend and worked my butt off. It went splendidly I must say. The barn was beautiful. The patrons were nice. The roses were blooming, no really, they were.


So, afterward, I noticed my stock was low. Normally this wouldn't be a problem. There are usually months between festivals for me to take my sweet time putting things together. Well, not the week. This Saturday is Route 66 Rendezvous in Edmond, OK. I have no drop spindles and 2 hanks of lace yarn. So, serious work must be done. Once again, normally I can get myself together and time crunch to get it all done. Except. . . I planned to teach a class on evening and had charity knit night another. Ug.

So here I am, one day away from the Fiber Festival, trying to get everything sorted, labeled and packed. I've carded a dozen batts, made 2 dozen drop spindles, and dyed another dozens hanks of yarn. Whew!

So thanks for reading my rant, and enjoy the rest of your day. I'll be here manning the drum carder. ; )

Thursday, March 18, 2010

Coffee and Tea Dyeing Sock Yarn

Today was a successful experiment in dyeing naturally using tea and coffee. I have a lot of different types of teas. Yes, I love tea, but there is now way that I could drink all that I own. I had heard of coffee dyeing before and had wanted to try it. Lots of people have dyed successfully using coffee. So why not give it a try?

I had heard before that tea actually stains your teeth worse than coffee. I thought if this were true, it would make a great dye as well. With my unlimited supply of different varieties, I grabbed a couple of bags and went at it using this BLOG POST as a guide to get me started.

I used 10% WOG alum and 5% cream of tarter for each yarn that was soaked in bottled water. (The water here in town is very hard and I didn't want any surprises from it.) After squeezing all the water out, I put them into my tea and coffee solutions to set in my oven at 170 degrees for an hour. Then, after a thorough rinsing, I placed them outside to dry. They aren't very dark, but that's okay. I love the colors. Oh, and let me add it took a lot less tea to dye the yarn than coffee. I used 4 tea bags for 2 hanks versus 4 cups for 3 hanks.


The first photo is coffee and the second is my tea brew experiment. I personally love the tea version. It looks like a granny apple to me. I plan to explore more varieties of tea and see what happens. So stay tuned!

Friday, March 5, 2010

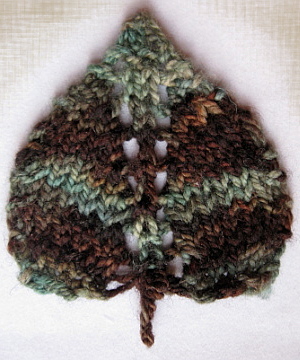
Dark and Lavender Leaf Knit Pattern


Dark and Lavender Leaf
By Dawn L.E. Riden

Inspired by Georgie O’Keeffe’s “Dark and Lavender
Leaf” this simple knit simply showcases the beauty
already found in nature. Knit it up to use on hats, bags, as
an ornament, or even sew it onto a shawl pin back for a
nice accessory.

FINISHED MEASUREMENTS
Length: 4 inches
Width: 3 inches

MATERIALS
Light Brown Hare Jackrabbit Fingering Yarn
[100% Superwash Merino; 400 yd/m per 50g skein];
color: Sunken Treasure; scraps ~10 yards

Recommended needle size:
1 set US #3/3.25mm straight/circular/double point
needles

PATTERN
Row 1: CO 1
Row 2: KFB (2 sts)
Row 3: K across
Row 4: KFB (4 sts)
Row 5: K across
Row 6: K1, yo, k2, yo k1 (6 sts)
Row 7 and all odd: K2, Purl to last 2 sts, k2 (6 sts)
Row 8: k2, yo, k2, yo, k2 (8 sts)
Row 10: K1, kfb, k1, yo, k2tog, yo, k1, kfb, k1 (11 sts)
Row 12: k5, yo, k1, yo, k5 (13 sts)
Row 12: K6, yo, k1, yo, k6 (15 sts)
Row 14: K7, yo, k1, yo, k7 (17 sts)
Row 16: k6, k2tog, yo, k1, yo, ssk, k6 (17 sts)
Row 18: k6, k2tog, yo, k1, yo, ssk, k6 (17 sts)

Divide sts into 3 sections of 8, 1, 8

On the right side:
Row 20: K1, k2tog, k1, k2tog, k1
Row 21: K2, p3, k2
Row 22: BO knitwise

To make matching bind off on the left side turn work over:
Row 20: P1, p2tog, p1, p2tog, p1.
Row 21: K across
Row 22: BO purlwise

For the stem st, k the st 4 times.
BO and weave in all ends reinforcing stem and sides.


Copyright 2010. Dawn L.E. Riden. These patterns are for personal and non-profit use only. You may not sell items made from these patterns. You may make them for yourself, as gifts, or for donation to charity sales or auctions. And these patterns love being used for knitalongs or other organized knitting events that are free of charge.

Merchants may not download or print these patterns for sale, free distribution, or class use without prior written permission from the author (that’s me, Pam). If you received one of these patterns directly from a yarn store, or are taking a paid class using one of these patterns (even if you downloaded it yourself), please verify that the store has written permission from the author.
Printing or downloading a pattern constitutes agreement with these terms.