Showing posts with label Free Patterns. Show all posts

Thursday, November 28, 2013

How to Create Your Own Teeswater Cowl

Many knitters have asked me how I created my beautiful Teeswater cowl I posted in my Dawning Dreams group on Facebook. So I decided to write it down for you. I want to warn you though, this is not truly a pattern. I'm not out to give you every last detail to how I made mine because it was an invention of the imagination and the fibers. The yarn is my handspun from my friends sheep. It is a one-of-a-kind in an of itself. So, to tell you to use this or that yarn would be like trying to repaint a famous work of art. Don't let that turn you off, however. Instead, look at this as an opportunity to create your own "work of art" using your knowledge and skills. So, if I haven't scared you off by now, let's begin.


Materials:
  • ~200 yards of a thick and thin spun, super bulky single (My handspun for the body  was Oklahoma-grown Rambouillet fiber from Lowder Colours Farm.)
  • 4-8 oz of long, (~6-7") Teeswater wool locks (other varieties of locks could include mohair, Wensleydale, or Suri alpaca to name a few.) 
  • Size 15 Circular Knitting needles (mine are Denise Interchangeables)

Methods Employed:
  1. The yarn is a thick and thin single, as I said before. The thickest parts are about the width of my thumb. If you don't know how to spin thick and thin check out Jacey Boggs Sit and Spin! DVD.
 

2. The Teeswater locks were about 6-7' long and slightly felted on the cut ends. I purchased mine from Lowder Colours Farm right here in Oklahoma. This is important! The slightly felted ends allowed my to create a hole, that you will see to add as fringe. The following images show you how to create the hole.


Once you have all your supplies gathered, we're now onto the "pattern" part.
  1. Cast on 70 stitches on the size 15 circular knitting needles. Side note here: If you don't like it as large around the neck, decrease the amount of cast on stitches. Keep in mind. though, you will have to increase to get back to the needed number later to get around your shoulders.
  2. Join beginning and end to form circle.  Don't twist the stitches!
  3. Work four (4) rounds in purl stitch. This will creating a Stockinette that will roll the collar. 
  4. Now, work (2) rounds in knit stitch. This will create a division between this and the next bump.
  5. Work (4) more rounds in purl stitch. 
  6. Work 10 rounds of knit stitches. 
  7. Increases begin here; make an increase every 7 sts all around. I used Make One Front as seen in the Knitting Help video collection at http://www.knittinghelp.com/videos/increases. This will increase your overall number by 10 sts (80 sts)
  8. Knit (5) more rounds. 
  9.  Increases begin here, make an increase every 8 sts all around. This will increase your overall number by 10 sts (90 sts)
  10. Knit (2) rows. 
  11. Now for the shaping... and insertion of locks
  12. We're going to bind off (15) stitches now, but at the same time add locks for the fringe. Using the method above for creating a hole in the tail end of a lock, you will add a lock into the needle before binding off the stitch. As you knit the stitch, you will pull the lock and yarn through as one. It's kind of like thrumming. If you don't know how to do this, check out on the Daily Knitting video at http://www.youtube.com/watch?v=YeCIghU9gT0. Instead of folding the roving, you'll just add the end through and leave the beautiful tip hanging. 
  13. Here's the tricky part because I did not know how much yarn I had so I decided to go until I had enough to bind of. With what I had left, it created a gentle curve, but if you had a lot much yarn, it would eventually come to a point.
  14. From now on, until you run out of yarn, you will bind off (1) one stitch at the beginning and end of each row while adding a lock or two each time. Your method may be different than mine, but I simply K2Tog (knit two together) on the knit rows, and P2Tog (purl two together) on the purl rows.The more locks you add, the fluffier it'll be, but it will also be harder to knit. Find what's comfortable for you. 
  15. Keep up this pattern until you have just enough yarn to bind off. (I made another 15 rounds before needing to bind off.) Bind off remainder stitches as mentioned in number 12 above. 
  16. Weave in any ends.
The finished product should have a nice gentle asymmetrical curve from the thinner part to the bottom. This gives you flexibility on wearing it.

If you like this or any other DIY tutorials, feel free to donate directly to me using the link below. I truly appreciate anything you can offer to keep me creating. 


Friday, March 5, 2010

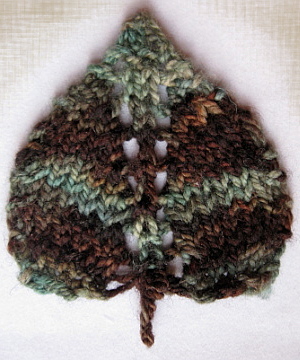
Dark and Lavender Leaf Knit Pattern


Dark and Lavender Leaf
By Dawn L.E. Riden

Inspired by Georgie O’Keeffe’s “Dark and Lavender
Leaf” this simple knit simply showcases the beauty
already found in nature. Knit it up to use on hats, bags, as
an ornament, or even sew it onto a shawl pin back for a
nice accessory.

FINISHED MEASUREMENTS
Length: 4 inches
Width: 3 inches

MATERIALS
Light Brown Hare Jackrabbit Fingering Yarn
[100% Superwash Merino; 400 yd/m per 50g skein];
color: Sunken Treasure; scraps ~10 yards

Recommended needle size:
1 set US #3/3.25mm straight/circular/double point
needles

PATTERN
Row 1: CO 1
Row 2: KFB (2 sts)
Row 3: K across
Row 4: KFB (4 sts)
Row 5: K across
Row 6: K1, yo, k2, yo k1 (6 sts)
Row 7 and all odd: K2, Purl to last 2 sts, k2 (6 sts)
Row 8: k2, yo, k2, yo, k2 (8 sts)
Row 10: K1, kfb, k1, yo, k2tog, yo, k1, kfb, k1 (11 sts)
Row 12: k5, yo, k1, yo, k5 (13 sts)
Row 12: K6, yo, k1, yo, k6 (15 sts)
Row 14: K7, yo, k1, yo, k7 (17 sts)
Row 16: k6, k2tog, yo, k1, yo, ssk, k6 (17 sts)
Row 18: k6, k2tog, yo, k1, yo, ssk, k6 (17 sts)

Divide sts into 3 sections of 8, 1, 8

On the right side:
Row 20: K1, k2tog, k1, k2tog, k1
Row 21: K2, p3, k2
Row 22: BO knitwise

To make matching bind off on the left side turn work over:
Row 20: P1, p2tog, p1, p2tog, p1.
Row 21: K across
Row 22: BO purlwise

For the stem st, k the st 4 times.
BO and weave in all ends reinforcing stem and sides.


Copyright 2010. Dawn L.E. Riden. These patterns are for personal and non-profit use only. You may not sell items made from these patterns. You may make them for yourself, as gifts, or for donation to charity sales or auctions. And these patterns love being used for knitalongs or other organized knitting events that are free of charge.

Merchants may not download or print these patterns for sale, free distribution, or class use without prior written permission from the author (that’s me, Pam). If you received one of these patterns directly from a yarn store, or are taking a paid class using one of these patterns (even if you downloaded it yourself), please verify that the store has written permission from the author.
Printing or downloading a pattern constitutes agreement with these terms.

Friday, June 19, 2009

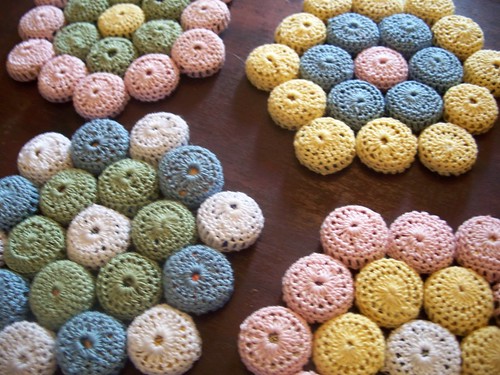
Bottle Cap Hot Pad Pattern


Beer Cap Hot Pad
by Dawn L.E. Riden


I originally made several of these for a vintage crochet potholder swap. They were such a huge hit, I decided to write down the pattern to share with everyone.


SIZE
6.5 inches across

MATERIALS
Aunt Lydia's Classic Crochet (Size 10); need approximately 75 yards
Size 9/1.40MM crochet hook
19 beer caps of your choice
Sewing needle

GAUGE
24 dc/12 rows = 4" in stockinette stitch

PATTERN NOTES
Ch = Chain
Dc = Double Crochet
Sc = Single Crochet
Sc Dec = Single Crochet Decrease (Insert hook in first stitch indicated, yo, pull up loop, insert hook in second stitch indicated, yo, pull up loop, yo, pull through remaining 3 loops on hook.)
Sl St = Slip Stitch


PATTERN
Cap Cover

Ch 5, slst to first stitch to join.
Ch 3, 15 dc in ring, slst to join at top of ch 3. Make sure to dc over the tail of the chain to hide it. (16 dc)
Ch 2, sc in same st, *1 sc the next three sts, 2 sc in next st*, repeat between * two more times, sc 3, slst with top of Beg ch to join (20 sts)
Ch 2, sc in every st around, slst with top of Beg ch to join. (20 sts)
Ch 3, dc in every st around, slst with top of Beg ch to join. (20 sts)
Insert bottle cap before decreasing. 
Sc Dec around, slst with top of Beg ch to join (10 sts)
Sc dec around, slst with top of Beg ch to join (5 sts)
Break thread and weave through remaining 5 loops, tie closed and weave in ends.

FINISHING

Using scrap crochet cotton, sew 6 cover caps around one central cap on the underneath side where they touch. Then join 12 covered caps around the six. You can mix and match color however you like, so use you imagination!


ABOUT THE DESIGNER
Dawn is an energetic doting mother of 3, loving wife of 1, and friend to many. She enjoys creating unique designs using wire, yarn, and fabrics. To learn more about her and her inspiration, check her out on her blog at: www.dawningdreamsblog.blogspot.com
You can also support her habit by checking out her online store at:
www.dawningdreams.etsy.com


Copyright 2009. Dawn L.E. Riden. hese patterns are for personal and non-profit use only. You may not sell items made from these patterns. You may make them for yourself, as gifts, or for donation to charity sales or auctions. And these patterns love being used for knitalongs or other organized knitting events that are free of charge.

Merchants may not download or print these patterns for sale, free distribution, or class use without prior written permission from the author. If you received one of these patterns directly from a yarn store, or are taking a paid class using one of these patterns, please verify that the store has written permission from the author.
Printing or downloading a pattern constitutes agreement with these terms.

Saturday, March 21, 2009

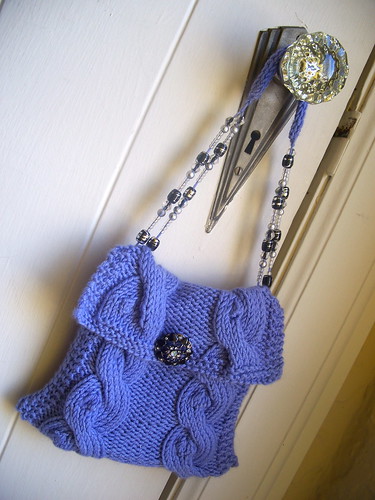
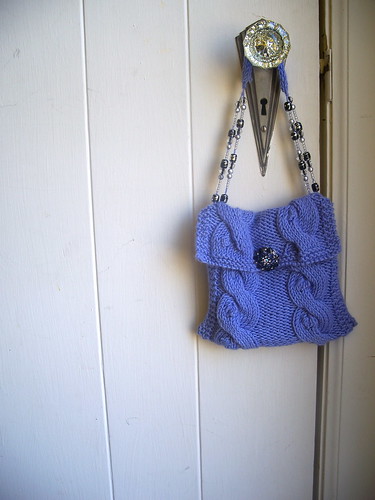
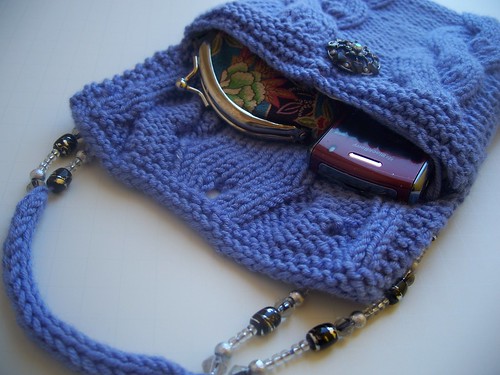
Illustrious Purse Pattern


Embellishing handbags to fit your personal style transforms a simple bag into a wearable art. This purse all started with a button. My brother-in-law bought me a beautiful new jacket as a present, and attached along with it, a stunning multifaceted button.

I retain a collection of buttons and beads from numerous sources hidden away in my sewing supplies. They only see the light of day when I open the box to add a new button or a new bead. I could not, however, add this cherished button to the forgotten button stash.

Pulling out a luxurious silk/cashmere yarn, I designed this shoulder bag to showcase the buttons beauty. With its simple rectangular construction and cable/bobble lines, it will easily highlight your treasure as well. Beaded handles add depth, and they are as easy to create as the bag itself. Its beauty can only be enhanced by your imagination!


SIZE
One Size

FINISHED MEASUREMENTS
Width: 6.5 inches
Length: 6.5 inches

MATERIALS
Laines Du Laines Cashsilk [50% merino, 25% silk, 25 % cashmere]; 67yd per 25g skein]; color: Partita; 2 skeins

1 set US 8/5mm straight needles
1 set US 8/5mm double point needles
Cable needle
1 – ¾-inch button
Beads with large center hole (Fashion Glass #3123005 used in photo)
Tapestry Needle
.25 yrds fabric for lining
Sewing needle
Thread to match yarn and lining

GAUGE
24 sts/18 rows = 4" in stockinette stitch

PATTERN NOTES
C10F: sl 5 sts onto the cn and hold in front of work, k5 and, k5 from cn.
Bobble Increase: K into front, then back, then front, then back, then front again of next st: 1 st increased to 5 sts.
Bobble Decrease: P5tog. 5 sts decreased to 1 st.

PATTERN

Bag:
CO 29 sts.

Rows 1-6: K
Row 7: K2, p10, k5 , p10, k2
Row 8: K2, k10, p5, k10, k2
Row 9: K2, p10, k3, YO, k2, p10, k2 (30 stitches)

Beginning on row 3 of following pattern, work 8 pattern repeats.

Pattern:
Row 1: K2, p10, K6, p10, K2
Row 2: P2, K10, p6, K10, p2
Row 3: K2, p10, K6, p10, K2
Row 4: P2, K2, Bbl Inc, K7, p6, K10, p2
Row 5: K2, C10F, K6, K14, p2
Row 6: P2, K2, Bbl Dec, K7, p6, K10, p2
Row 7: K2, p10, K6, p10, K2
Row 8: P2, K10, p6, K10, p2
Row 9: K2, p10, K6, p10, K2
Row 10: P2, K10, p6, K2, Bbl Inc, K7, p2
Row 11: K2, p14, K6, C10F, K2
Row 12: P2, K10, p6, K2, Bbl Dec, K7, P10

Knit 8 rows. BO and weave in ends.


I-cord Handle
CO 4 stitches using double pointed needles. Knit across. Instead of turning, slip the stitches back to the beginning of the needle and knit the row again. As you pull the i-cord straight, the gap on the back will tighten up and close.

Continue in this manner until it is 6 inches. Cut yarn leaving 8-inch tail, and thread the yarn through the stitches and pull firmly.

Cut one 24-inch length of yarn. Thread through the middle of the i-cord. Now you will have an i-cord with two strands of yarn on the ends. Tie a knot to secure the tails to the i-cord.

The beads are packaged on a plastic wire to ensure easy transfer to your project. Simply, tie the bead wire to the yarn, and slide beads from the wire to the yarn handle.


FINISHING
Fold 5 inches of bottom up and seam sides.

Attach the i-cord handle by spreading out the two strands and threading them through the top of the purse and tying a knot. Repeat on other side.

For the lining, cut a 6-inches by 12 inches rectangle from lining fabric. Fold fabric in half lengthwise, and sew 6 inches of each long edge of rectangle, beginning at fold.

Fold over 0.5 inch of the top edges of lining and press. To hide the ends of the handle, slip fabric pocket with wrong sides facing out inside the purse, covering the strap knots and sew around the top. Attach button to front of purse.


Copyright 2009. Dawn L.E. Riden. hese patterns are for personal and non-profit use only. You may not sell items made from these patterns. You may make them for yourself, as gifts, or for donation to charity sales or auctions. And these patterns love being used for knitalongs or other organized knitting events that are free of charge.

Merchants may not download or print these patterns for sale, free distribution, or class use without prior written permission from the author. If you received one of these patterns directly from a yarn store, or are taking a paid class using one of these patterns , please verify that the store has written permission from the author.

Printing or downloading a pattern constitutes agreement with these terms.

Friday, February 20, 2009

Ribbed Lip Balm Holder


SIZE
One Size

FINISHED MEASUREMENTS
Length: 3 inches

MATERIALS
Leftover scraps of sock yarn
1 set US size 0 double point needles
Tapestry Needle


PATTERN
Cast on 3 sts.
Work I-cord for two (2) inches.
Cast-on 15 more sts using knitted cast-on and join round. (18 sts)
Divide onto three (3) double point needles to begin working in the round.
Work three (3) rounds of stockinette st.
On fourth round, begin 2X2 ribbing by k2, p2. You will end with a ridge of 4 knit sts on the back of the tube. (If you don't want a 4 st ridge you can K3,P3 around. I like the ridge on my fingers)
Work in this pattern for another two (2) inches.
Knit one round.
K2tog around. (9 sts)
K2tog around, then knit last st. (5 sts)
Break yarn leaving 8" tail and weave tail through live loops. Pull tail tightly to close hole, and weave in all ends.

To form loop on top fold i-cord down and use the tail to attach the top of the cord to the bottom where the tube starts. You can make it fit a belt by making the i-cord longer.

Enjoy!


Copyright 2009. Dawn L.E. Riden. These patterns are for personal and non-profit use only. You may not sell items made from these patterns. You may make them for yourself, as gifts, or for donation to charity sales or auctions. And these patterns love being used for knitalongs or other organized knitting events that are free of charge.

Merchants may not download or print these patterns for sale, free distribution, or class use without prior written permission from the author . If you received one of these patterns directly from a yarn store, or are taking a paid class using one of these patterns, please verify that the store has written permission from the author.

Printing or downloading a pattern constitutes agreement with these terms.

Monday, September 29, 2008

Black Widow Spider

NOTE: This pattern will only be free until the end of October to celebrate Halloween. After which, it will be available on Esty and Ravelry for purchase.

Beware this Widow’s bite. Though she might seem of even temperament, she may attack your Halloween guest unprovoked!


Difficulty:
Intermediate

One Size
Materials:
US #3 dpn’s
MC, scraps of black or purple black sock yarn ~50 yards
CC, scraps of red sock yarn
Tapestry needle
Pattern notes:
Fbl=knit through front loop & back loop of same stitch


Copyright 2008. Dawn L.E. Riden. All rights reserved. For personal use only. Not for commercial sale.

Wednesday, July 23, 2008

Tie Me Up Spats


While designing a Steam punk outfit for a special event, I came up with this pattern for some Victorian inspired spats to accommodate my vision. I feel that if a pattern is this easy, it should be free!

Simply add your own personal touches to make it yours!

Finished Size:
12 inches around top, 15 inches around bottom edge, and 7 inches tall

Materials:
Red Heart Super Saver Yarn, 150yards
Size I crochet hook
Ribbon
Needle for sewing in ends

Pattern notes:
Half Double Crochet (hdc)- Yarn over hook, insert hook in stitch, yarn over hook, pull a loop through the stitch, yarn over hook, pull yarn through all three loops on the hook.

Pattern:
Ch 36, turn.
Ch 2, hdc across, turn.

*Ch 2, hdc 1, Ch 1, skip 1, hdc across to last three sts, Ch 1, skip 1, hdc last two sts, turn.
Ch 2, hdc across. *
Repeat from * 4 more times.


*Ch 2, hdc 1, ch 1, skip 1, 2 hdc in next st, hdc across to the last four sts, 2 hdc in next st, ch 1, skip 1, hdc last two sts, turn.
Ch 2, hdc 1, 2 hdc in next st, hdc across to last three sts, 2 hdc next st, hdc in last two sts.*
Repeat last town rows from * 2 more times. BO and weave in ends.

Lace ribbon through ch1 spaces like a shoe.


Note: To make taller, repeat between the first two *'s until it reaches desired length.

Copyright 2008. Dawn L.E. Riden. All rights reserved. For personal use only. Not for commercial sale.

Tuesday, July 15, 2008

Circumvenio Bracelet


From the latin word meaning "to come around", this bracelet was a beginning of a journey into the world of rings. From scrapes of stainless steel rings to fantastic bracelets!

My husband and I make our own chainmaille rings for various projects. Unfortunately, not all rings are the same, and we have a discarded or "dead" pile of rings that have accumulated over time. I cannot stand to see anything go to waste. So was born the Circumvenio bracelet!

Finished Size: 9 inches around

Materials:
Aunt Lydia's Fashion Crochet Thread
Size D/3.25 mm crochet hook
5/8" steel ring (you could also try the little plastic ones sold at the store)

Pattern:
Starting with a closed ring, hook and pull yarn through center of ring, YO, pull through loop. (Now, yarn is attached to ring.)
Sc half way around the ring.
Add second ring by inserting hook through ring, YO, pull through center of ring, YO, and pull through both loops.
Sc half way around ring again.
Continue adding rings until you get to a length that will fit around your wrist.

The yarn will give some wiggle room when you close the circle, but make sure it's snug enough to still stay on.
When you get the bracelet to the desired length, connect the first ring to the last using the previous method.

Finish the other half of the bracelet by sc the other half and joining to the next ring, thus reinforcing the joins.

When you reach the end, break yarn, and weave in ends, and "Presto!".

Copyright 2008. Dawn L. E. Riden. All rights reserved. For personal use only. Not for Commercial sale.

Friday, July 11, 2008

Katya Choker

Finished Size: 12 inches long X 1 inch wide

This was actually inspired by a good friend of mine who sometimes wears a ribbon for a necklace. It's simple and elegant and says so much about the person wearing it.

Materials
Yarn: Aunt Lydia's Fashion Crochet Thread (size 3)
Hook: Size D/3-3.25 mm or size needed to obtain gauge
Notions: Sewing needle, ribbon (1/2")

Special Stitches (US):
Single crochet (Sc): Insert hook into indicated stitch, yarn over and then draw up through loop. There are now two loops on you hook. Yarn over and draw yarn through both loops on your hook. Single Crochet complete.
Treble Crochet (Tr): Yarn over hook twice, then insert hook into next stitch.
Yarn over hook and draw yarn through stitch. There are four loops on the hook.
Loop yarn over hook and draw through two loops There are now three loops remaining on the hook. Yarn over hook and draw through two loops. Again, loop yarn over hook and draw through the last two loops on the hook. There is now one loop remaining.
This completes one treble crochet.
Shell st: Single crochet (sc), then skip two chains and double crochet (dc) into third stitch 8 times (fan made). Skip the next 2 stitches, and sc into third stitch.

Pattern:
Chain 72
Ch 1, sc across (72 total)
Ch 4 (counts as first treble, ch1), tr in 6th st from hook,*ch1, sk 1, tr,* repeat from *
Ch 1, sc across
Skip 2, 8 dc in third stitch from hook, *shell*, repeat across (12 shells).
Bind off and weave in ends.

Block and weave ribbon in and out through treble chains. Make sure you cut the ribbon long enough to go around your neck and tie into a bow.

copyright 2008 Dawn L.E. Riden, all rights reserved. For personal and private use only. Not for commercial sale.


Saturday, June 14, 2008

Scalloped Bracelet


Button view
Originally uploaded by Dawning Dreams
Finished size: 7.25 inches long X 1 inch wide

Materials
Yarn: DMC Petra Crochet Cotton 5, (scrap)
Hook: size D/3-3.25 MM or size needed to obtain gauge
Notions: sewing needle, button


Special Stitches:
Puff st: Yarn over, insert hook into the stitch, pull through loop until it is as tall as a dc. Now with three loops on your hook, yarn over, insert hook into the same stitch and pull through until it is as tall as the last pulled. Now you have 5 loops on your hook. Repeat three more times until there are 11 loops on your hook. Yarn over and draw strand through all 11 stitches. Close with chain stitch by yarning over and pulling through.

Shell st: Single crochet (sc), then skip two chains and double crochet (dc) into third st 12 times (fan made). Skip the next 2 st, and sc into third st.


Ch 58
Ch 1, (counts as first sc) 2nd chain from hook sc 57 across, turn. (58 total)
Ch 1, sc across, turn. (58 total), turn 
Ch 2 (counts as first dc), dc 1, ch1, *skip st, puff st* repeat from * across to last 2, dc 2, turn.
Ch 1, sc across, turn. (58 total)
Ch2, 2 sc, skip 2, shell, skip 2, *shell* repeat from * across until last two st, 2 sc. (9 shells total)
Bind off.
copyright 2008 Dawn L.E. Riden, all rights reserved
Monday, June 2, 2008

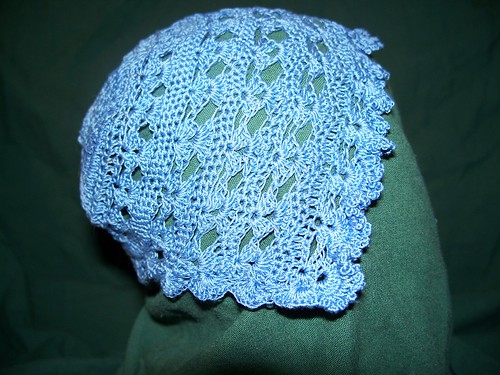
Vintage Shells Bonnet Pattern

ETA 9/2009:
Let me just say that the original pattern written here was completely backwards engineered from an existing bonnet that is more than 60 years old. It is beautiful, but some of the techniques, I've come to realize, are outdated. I meticulously went through the entire thing writing it down as I crocheted a copy too. After reading the following pattern, look to the bottom for my updated take on the bonnet. It should help clear up the confusion.

It's my first time writing a pattern so if there is a discrepancy, please let me know! To make a 0-3 mo, I used a D/3-3.25 size hook. So gauge can be very important.


Crochet thread size 20
Crochet hook D for 0-3 month


Vintage Shells Bonnet pattern:

Ch9 join into ring

Rnd 1: Sc 18 in ring (slip stitch to close all following rings)

Rnd 2: Ch3 (counts as fist dc), dc 17 (18 total)

Rnd 3: Ch 3, dc 17

Rnd 4: Ch 3, dc sp, *2 Dc in sp* repeat around (36 total)

Rnd 5: Ch 3, Dc 35

Rnd 6:Ch 3, dc in sp. *2 Dc each sp* repeat from * (72 total)

Rnd 7: Ch 3, Dc 71

Rnd 8: Ch 3, Dc 71

Rnd 9: Ch 3 (counts as first dc) Dc 2 Ch 1 Dc 3 in same stitch (makes first fan)

*Skip 5 Dc 3 Ch 1 Dc 3 in same stitch* repeat * Join ends of first fan with second fan. (12 fans total)

slst over to ch1 space in first fan

Rnd 10: Ch 3 (counts as first dc) Dc 5 in same stitch (makes fan)

*Skip to next fan ch1 space. Make 6 dc in sp* and repeat between *'s around. Join ends of first fan with second fan.

Rnd 11: Ch 1, Sc around and join

Rnd 12: Ch 1, Sc around and join

Rnd 13-16: repeat Rnds 9 – 12

Now, we begin the bill of the hat, which will be worked back and forth rather than around.

Slst over 2 spaces above the center of the fan below it.

Row 17: Ch 3 (counts as first dc) Dc 2 Ch 1 Dc 3 in same stitch (makes first fan)

*Skip 5 Dc 3 Ch 1 Dc 3 in same stitch* Turn. (10 fans)

Slst over to ch1 space in fan.

Row 18: Ch 3 (counts as first dc) Dc 5 in same stitch (makes fan) *skip over to ch1 sp in next fan. Dc 6 in sp. Skip to next fan ch1 space and repeat *. Turn.

Row 19: Ch 2. Sc across. Turn.

Row 20: Ch 2. Sc across. Turn.

Row 21 & 22: Repeat Row 17 & 18

Row 23: Ch 3 (counts as first Dc) Dc across. Turn.

Row 24: Ch 2 (counts as first sc) Sc across. Turn.

Slst over 2 spaces above the center of the fan below it.

Row 25-32: Repeat rows 17-20 twice more.

Now to put on the edging.

Rnd 33: Sc around complete perimeter of bonnet.

Rnd 34: Beginning on middle of fan on the front corner. Ch 3. Dc 9 in same space. Skip sp. Sc. Skip sp. *Dc 10 in sp. Skip sp. Sc. Skip sp.* Repeat * across Join ends of last fan with first fan.

Rnd 35: *Dc, ch2 in sp.* Repeat around and bind off. Done!

You can thread any color ribbon you want in the Dc in the middle of the brim and through the bottom and front brim shells to secure it the head. Enjoy it as much as I have!


ETA: I've made several bonnets based on this pattern out of various weights of yarn and even different hook sizes, but here are the updated notes on it.

First off, I do not make a circle using rounds 1-16 above. That is the old fashioned way of doing it. I use the current system in which I do the following:

To Begin: Chain 4. Slst join.
Rnd 1: Ch 3, 5 dc in center of circle. Sl st in 3rd ch of ch 3, to join.
Rnd 2: ch 3, 2 dc in ea dc around. Sl st in first dc, to join.
Rnd 3: ch 3, (dc in next dc, 2 dc in next dc) around. Sl st in first dc, to join.
Rnd 4: ch 3, (dc in ea of next 2 dc, 2 dc in next dc) around. Sl st in first dc, to join.

Additional Rnds: For each new round, add 1 extra dc stitch to the number of dc stitches between increases (an increase is done by making 2 dc in one stitch). For example, round 5 would have 3 dc between increases then round 6 would have 4 dc between increases and so on.


After I make the circle large enough to cover the back of the babies head, I start making the fans. My system is to ch3, 2dc, ch, 3dc in the same st, *skip 5, dc3, ch2, dc3 in same st*, and repeat between *'s until there is enough space for two more fans. ch3, turn.

On the way back make a 6dc fan in each ch2 space across making sure to connect the last dc with with the fan tip below it. Ch2, turn.

Crochet two rows of sc.

Repeat the two rows of fans and two rows of sc until it reaches the forehead of the baby.

Now, it's time for the border. Working along the outer edge of the entire bonnet including the front sides and back where there are no fans. I crochet 8 dc fans after every 5 sts. This insures a very ruffly border. Finally, I dc in every stitch around one more time to add more fullness.

Cut tail and weave in.