Monday, December 15, 2008

Socks


I finally decided to tackle socks. I have long questioned the popularity of sock making in the knitting community. It seemed like a lot of work for something you can go buy at the store for less than a dollar. Most of the opinions that I've heard are that they are portable and easy to knit. Mindless knitting was actually the term used.

So, I looked for a basic pattern to begin with, and I found Basic Ribbed Socks by Kate Atherly on Ravelry. The general consensus was that this was a great pattern to start with. The ribbing allows a great fit without being a mind-numbing K2P2 ribbing.

After getting the first sock most of the way done, I realized that I was going to need a sock blocker to make sure both of my socks wind up the same size. Being a frugal mother, I decided to make my own. I found a great DIY tutorial for Super Easy DIY Sock Blockers on Little Seasame Knits by Maryann that outlined how to make your own for a dollar. Unlike some tutorials, it actually proved to be right. Without the cost of scissors and paper, it actually only cost me a dollar!


I am now done with the first sock, and it's on my special homemade blocker. (Very exciting!) I am not enthralled with the process as some people, but I can see its uses. Lord knows I have a lot of sock yarn around. I love the way it feels and looks.

I hope this may inspire some of you to give sock knitting a try. Who knows, you may love it and want to knit all of your family members socks for next Christmas!

Monday, September 29, 2008

Black Widow Spider

NOTE: This pattern will only be free until the end of October to celebrate Halloween. After which, it will be available on Esty and Ravelry for purchase.

Beware this Widow’s bite. Though she might seem of even temperament, she may attack your Halloween guest unprovoked!


Difficulty:
Intermediate

One Size
Materials:
US #3 dpn’s
MC, scraps of black or purple black sock yarn ~50 yards
CC, scraps of red sock yarn
Tapestry needle
Pattern notes:
Fbl=knit through front loop & back loop of same stitch


Copyright 2008. Dawn L.E. Riden. All rights reserved. For personal use only. Not for commercial sale.

Thursday, August 28, 2008

How to Make a Victorian Hat

I have been wanting a Victorian hat for some time now. Unfortunately, the type I was interested in would cost buckoo bucks that I could not afford. Being the crafter that I am, I figured if I did enough research, I could figure out how to make one with the materials I can get in my small town. I first read up on hat making to no avail. I am not a milliner and cannot find buckram without resorting to online purchases. And to tell the truth, I wanted to do it cheaper. This was a problem. I needed something that is flexible yet sturdy enough to form the base of the hat. Luckily, I got some great advice from others who were making hats in one of my previous blogs: Wired Mini Top Hat. So now with a plan I began to execute my procedure.


I began with craft mesh that I picked up from Walmart in the crafting section. It comes in sheets and circles. The circles are perfect enough that I don't have to do much trimming to get the size. I looked at Blanches Place for ideas on what form of hat I wanted. I settled on the 1870s hat. On the website, there are dimensions on the size of the hat. I used this as a starting step, but trimmed everything down to a shape I liked.

Then, I got out the 16 gauge wire (also can be found in the tools section at Walmart), and I attached the wire to the outside of the brim using the nylon thread I had purchased. This thread is stronger than cotton and will hold up better. I had tried on my sewing machine using a zig-zag stitch, but it didn't work well. Either it did catch the mesh or the needle kept hitting the mesh and bending. The wire is traditionally used to shape the brim when completed.

After that I sewed the top plastic circle to the brim making sure that the bottom of the side of the hat matched with the inside circle of the brim and the top circle. After this step, you have a bowl, of sorts.

Then I cut 4 pieces of fabric slightly larger than the frame: the top circle, the side of the hat, and two circles for the top and bottom of the brim piece. (I'm not very particular about the inside of the hat just yet.) I hot glued the smaller of the circles to the top of the hat. Then I glued fabric to the side of the hat making sure to role the fabric down on the top of the hat to make a nice finish.

Now, I took the two larger circles with right sides facing one another, and stitched around most of the perimeter. After flipping it inside out, I slid in the wired brim section and sewed the rest shut trying to keep the stitches as invisible as possible.
Then, I cut a circle out of the middle of the brim piece, making sure to leave enough to fold up to secure to the inside of the hat sides. I glued and sewed it altogether. After making sure all the seams are nice looking, I add any finishing touches, and there it is!

Hope this helps some!


ETA: Here's another hat I recently made that didn't include the wire brim, but holds it shape perfectly.

Thursday, August 21, 2008

Baby Hats for Charity


I'm a big supporter of volunteer work. Before I had my littlest one, I used to drive meals for Meals-on-Wheels and cook for the Senior Center where I used to live. After moving to our new town, I attempted to volunteer for our local WIC, and was basically blown off. I was very disappointed. So, in lieu of actually going out and giving my services, I have been making newborn hats for a charity. They don't take very long to make. I picked a simple pattern that I can do anywhere, but I enjoy sharing something that makes a special day even more memorable. I know more people can volunteer somehow, if they just found something that appeases them. So, in honor of all those who want to give back. Here's my two cents. . .

Other Victorian Hat


I got the other finished yesterday, but didn't have time to post it. This one is more classically Victorian to me. It's larger for more room to add extras. As I expected, this one was easier to make overall. I cut down the sewing by hot gluing some of it, which worked very well with the plastic frame. I still sewed the wire onto the frame and the brim. When I put it on, it looks huge, but I know when I get my hair up and into some period clothing, it'll be perfect.

Sunday, August 17, 2008

Podium


I finished my last Ravelympics project today. She's The Thrifty Critter from Nikol Lohr. She's made from scraps from previous projects. I like how funny she looks. I laugh when I see her. Now onto more pressing matters. I feel to urge to design something again. What, I'm not sure.
Maybe the Critter will tell me. : )


Thursday, August 14, 2008

Ravelympics


I've been knitting like a madwoman these past couple of days for the Ravelympics. I have finished my long coveted Staitjacket from the Naughty Needles by Nikol Lohr. I love this sweater, and am contemplating making another out of a different yarn. The style suits me well.
I also finished a swap hat for my partner. AND I finished spinning two skeins of yarn! Wow!


I saw, also through Nikol Lohr, that there is a Yarn & Fiber School that she is hosting in Kansas. I wish I could go. I would love to learn some new techniques and get together with other yarnies, but I honestly can't afford the tuition. We are barely scraping by on one income! Maybe I should suggest a scholarship?


Here's a close-up on my purple skein. I think I've gotten better at being more constant with the drafting and spin. It's a beautiful color! Now to figure out what to make or give it to. Hmm...

Wednesday, July 30, 2008

Adventures in Steampunk Spinning (Painting My Wheel)

UPDATED-


After spinning my first skein of yarn on my new Babe's Spinning Wheel, I realized that the white PVC pipe "look" would simply not do. So I headed down to my local store to pick up some paint supplies to customize it. I got copper, gold, and bronze acrylic paint, along with metallic gun metal and black spray paint for plastics, and a satin top coat.


After roughing up the surface with sandpaper, I coated the whole thing in black. Then I sprayed the gun metal color. After that dried, I highlighted the joints with the copper acrylic on the joints and gold highlights throughout.


I contemplated staining the foot pedal and flyer, but I can't to afford all those supplies. So, I painted them in the bronze/gold acrylic paints, which came out beautifully. It's very steampunk inspired, and yet it matches my other house accessories wonderfully. It's now not an eye sore in the living room, and I love it!


UPDATED 6/20/2009
I got some gears from an Etsy store and glued them on. They are so cool!

Sunday, July 27, 2008

Fiber Christmas in July Festival


I had the pleasure of attending the Fiber Christmas in July Festival in Kellyville, OK! My Mil picked me up and we headed out together Saturday and arrived at the Fairgrounds around 12:30. Since it was only the second time they have had it, it wasn't very large, but about what I expected. The first thing I noticed when I walked in was all the spinning wheels everywhere! So salivating, I started walking around the booths. The first booth was manned by two delightful women selling roving and spinning material. They were very helpful in deciding what to buy without being pushy or know-it-all. You can find some of their stash at Weavery at Indian Meridian.


Then we looked around at the other booths. We found the woman who raises Alpacas in Oklahoma that we had seen at L&B Yarn Co last year who was selling more roving and yarn. She had more variety this year that was fun to see. I believe her website is Kindred Spirits.

There were also many non yarn booths which included baskets and odds and ends that were very interesting. We happened by the above doll at on of those booths. He reminded me of Carrot Top in a tuxedo. I also ran into Dark Twist from whom I purchased my Top Hat pattern from. Though I didn't realize it was her until I got home. It's always fun to meet the person behind the online persona.


And by the end of the day, a woman at one booth informed us of a spinning wheel that was for sell at a great price! I was so excited, but tried not to get my hopes too high. Naturally, one of the wooden beauties would be the epitome of a spinners dream, but I just wanted something to start with. So we got me a spinning wheel for $110 dollars plus some bobbins! I know it's not the prettiest thing, but I hope to rectify that by painting it. I tried spinning some when I got how and did fairly well considering I had never touched a spinning wheel in my life!

So our haul in the end was 6 skeins of yarn, 4 different types of roving to experiment with, a great spinning wheel, and a Niddy Noddy. But most of all, I had a great time meeting people, talking, and hanging out with my Mil.

Thursday, July 24, 2008

Steampunk Weaponry


(If you can think of a great name to write on the side of it, please let me know!)


Today, I worked on the pistol of the costume I'm designing. I found online, where a man was taking Nerf guns, and painting them up to look like ray guns. There was no way I was going to spend $40-50 for it when all I needed was some paint. So, after visiting my son's toy box, I found a water gun that was broken. (Repeat it with me, "Recycle, Reuse, RENEW" courtesy of The Little People also from my son's movie collection) I knew there was a reason I hadn't thrown it away! So after getting some metallic paints, and decorating, I have a fancy new toy to go along with my Air Pirate persona!


Now I know many people out there are wondering, "Why is this crazy girl doing this?". Well, it's simple, some people collect coins, some collect teapots, or roosters or even Mickey Mouse. I love to create things. Whether it be knit, crochet, paint, steel, or something that nobody has even named yet. I pride myself on being good at things that most others wouldn't even thought possible. It's a passion! So instead of asking me why, ask yourself, "What are you passionate about?"


Wednesday, July 23, 2008

Tie Me Up Spats


While designing a Steam punk outfit for a special event, I came up with this pattern for some Victorian inspired spats to accommodate my vision. I feel that if a pattern is this easy, it should be free!

Simply add your own personal touches to make it yours!

Finished Size:
12 inches around top, 15 inches around bottom edge, and 7 inches tall

Materials:
Red Heart Super Saver Yarn, 150yards
Size I crochet hook
Ribbon
Needle for sewing in ends

Pattern notes:
Half Double Crochet (hdc)- Yarn over hook, insert hook in stitch, yarn over hook, pull a loop through the stitch, yarn over hook, pull yarn through all three loops on the hook.

Pattern:
Ch 36, turn.
Ch 2, hdc across, turn.

*Ch 2, hdc 1, Ch 1, skip 1, hdc across to last three sts, Ch 1, skip 1, hdc last two sts, turn.
Ch 2, hdc across. *
Repeat from * 4 more times.


*Ch 2, hdc 1, ch 1, skip 1, 2 hdc in next st, hdc across to the last four sts, 2 hdc in next st, ch 1, skip 1, hdc last two sts, turn.
Ch 2, hdc 1, 2 hdc in next st, hdc across to last three sts, 2 hdc next st, hdc in last two sts.*
Repeat last town rows from * 2 more times. BO and weave in ends.

Lace ribbon through ch1 spaces like a shoe.


Note: To make taller, repeat between the first two *'s until it reaches desired length.

Copyright 2008. Dawn L.E. Riden. All rights reserved. For personal use only. Not for commercial sale.

Tuesday, July 15, 2008

Circumvenio Bracelet


From the latin word meaning "to come around", this bracelet was a beginning of a journey into the world of rings. From scrapes of stainless steel rings to fantastic bracelets!

My husband and I make our own chainmaille rings for various projects. Unfortunately, not all rings are the same, and we have a discarded or "dead" pile of rings that have accumulated over time. I cannot stand to see anything go to waste. So was born the Circumvenio bracelet!

Finished Size: 9 inches around

Materials:
Aunt Lydia's Fashion Crochet Thread
Size D/3.25 mm crochet hook
5/8" steel ring (you could also try the little plastic ones sold at the store)

Pattern:
Starting with a closed ring, hook and pull yarn through center of ring, YO, pull through loop. (Now, yarn is attached to ring.)
Sc half way around the ring.
Add second ring by inserting hook through ring, YO, pull through center of ring, YO, and pull through both loops.
Sc half way around ring again.
Continue adding rings until you get to a length that will fit around your wrist.

The yarn will give some wiggle room when you close the circle, but make sure it's snug enough to still stay on.
When you get the bracelet to the desired length, connect the first ring to the last using the previous method.

Finish the other half of the bracelet by sc the other half and joining to the next ring, thus reinforcing the joins.

When you reach the end, break yarn, and weave in ends, and "Presto!".

Copyright 2008. Dawn L. E. Riden. All rights reserved. For personal use only. Not for Commercial sale.

Monday, July 14, 2008

Winding up

I've worked up a pattern for a matching necklace to my chocker. BUT, I don't have any pictures yet to post. SO until I get that squared away, I'm keeping the pattern to myself. WhaaaHAaa Haaa!!!


I've been working lately on a beautiful shrug out of the Twinkles Big City Knits book. I would have it done by now, but I got frustrated when I tried it on and it seemed small. I gave into my frustration by putting it in timeout in the back of the stash. I think I've forgiven it, though, and plan to finish it within the next day. I've also decided to join the knitting olympics by completing a couple of projects within a two week period. So here's the swatch for a fun sweater (my first!).

On a side note, I want to give you all a laugh (because I do every time I see it) by introducing you to my Grandmother's bathroom. I always think of Austin Powers when I try to use it!

Friday, July 11, 2008

Katya Choker

Finished Size: 12 inches long X 1 inch wide

This was actually inspired by a good friend of mine who sometimes wears a ribbon for a necklace. It's simple and elegant and says so much about the person wearing it.

Materials
Yarn: Aunt Lydia's Fashion Crochet Thread (size 3)
Hook: Size D/3-3.25 mm or size needed to obtain gauge
Notions: Sewing needle, ribbon (1/2")

Special Stitches (US):
Single crochet (Sc): Insert hook into indicated stitch, yarn over and then draw up through loop. There are now two loops on you hook. Yarn over and draw yarn through both loops on your hook. Single Crochet complete.
Treble Crochet (Tr): Yarn over hook twice, then insert hook into next stitch.
Yarn over hook and draw yarn through stitch. There are four loops on the hook.
Loop yarn over hook and draw through two loops There are now three loops remaining on the hook. Yarn over hook and draw through two loops. Again, loop yarn over hook and draw through the last two loops on the hook. There is now one loop remaining.
This completes one treble crochet.
Shell st: Single crochet (sc), then skip two chains and double crochet (dc) into third stitch 8 times (fan made). Skip the next 2 stitches, and sc into third stitch.

Pattern:
Chain 72
Ch 1, sc across (72 total)
Ch 4 (counts as first treble, ch1), tr in 6th st from hook,*ch1, sk 1, tr,* repeat from *
Ch 1, sc across
Skip 2, 8 dc in third stitch from hook, *shell*, repeat across (12 shells).
Bind off and weave in ends.

Block and weave ribbon in and out through treble chains. Make sure you cut the ribbon long enough to go around your neck and tie into a bow.

copyright 2008 Dawn L.E. Riden, all rights reserved. For personal and private use only. Not for commercial sale.


Saturday, June 14, 2008

Scalloped Bracelet


Button view
Originally uploaded by Dawning Dreams
Finished size: 7.25 inches long X 1 inch wide

Materials
Yarn: DMC Petra Crochet Cotton 5, (scrap)
Hook: size D/3-3.25 MM or size needed to obtain gauge
Notions: sewing needle, button


Special Stitches:
Puff st: Yarn over, insert hook into the stitch, pull through loop until it is as tall as a dc. Now with three loops on your hook, yarn over, insert hook into the same stitch and pull through until it is as tall as the last pulled. Now you have 5 loops on your hook. Repeat three more times until there are 11 loops on your hook. Yarn over and draw strand through all 11 stitches. Close with chain stitch by yarning over and pulling through.

Shell st: Single crochet (sc), then skip two chains and double crochet (dc) into third st 12 times (fan made). Skip the next 2 st, and sc into third st.


Ch 58
Ch 1, (counts as first sc) 2nd chain from hook sc 57 across, turn. (58 total)
Ch 1, sc across, turn. (58 total), turn 
Ch 2 (counts as first dc), dc 1, ch1, *skip st, puff st* repeat from * across to last 2, dc 2, turn.
Ch 1, sc across, turn. (58 total)
Ch2, 2 sc, skip 2, shell, skip 2, *shell* repeat from * across until last two st, 2 sc. (9 shells total)
Bind off.
copyright 2008 Dawn L.E. Riden, all rights reserved

Thursday, June 12, 2008

Chevette Choker


Well, I originally meant to finish knitting other projects before starting a new one, but you know how that goes. I saw on a board that a knitter from Oklahoma had gotten one of her patterns published on Knitty.com. So, I went and started looking for her stuff and came across this beauty.

Ever since Jr. High, when chokers were popular, I had loved this style. For many years I didn't wear anything on my neck because of how short it is. However, I couldn't deny the beauty of this piece. I spent two days knitting this girl until it's now finally finished! I love it! I want to knit a million more now! Maybe I can open an Etsy.com store and sell stuff that I like there. Hmmm. . .

Monday, June 2, 2008

Vintage Shells Bonnet Pattern

ETA 9/2009:
Let me just say that the original pattern written here was completely backwards engineered from an existing bonnet that is more than 60 years old. It is beautiful, but some of the techniques, I've come to realize, are outdated. I meticulously went through the entire thing writing it down as I crocheted a copy too. After reading the following pattern, look to the bottom for my updated take on the bonnet. It should help clear up the confusion.

It's my first time writing a pattern so if there is a discrepancy, please let me know! To make a 0-3 mo, I used a D/3-3.25 size hook. So gauge can be very important.


Crochet thread size 20
Crochet hook D for 0-3 month


Vintage Shells Bonnet pattern:

Ch9 join into ring

Rnd 1: Sc 18 in ring (slip stitch to close all following rings)

Rnd 2: Ch3 (counts as fist dc), dc 17 (18 total)

Rnd 3: Ch 3, dc 17

Rnd 4: Ch 3, dc sp, *2 Dc in sp* repeat around (36 total)

Rnd 5: Ch 3, Dc 35

Rnd 6:Ch 3, dc in sp. *2 Dc each sp* repeat from * (72 total)

Rnd 7: Ch 3, Dc 71

Rnd 8: Ch 3, Dc 71

Rnd 9: Ch 3 (counts as first dc) Dc 2 Ch 1 Dc 3 in same stitch (makes first fan)

*Skip 5 Dc 3 Ch 1 Dc 3 in same stitch* repeat * Join ends of first fan with second fan. (12 fans total)

slst over to ch1 space in first fan

Rnd 10: Ch 3 (counts as first dc) Dc 5 in same stitch (makes fan)

*Skip to next fan ch1 space. Make 6 dc in sp* and repeat between *'s around. Join ends of first fan with second fan.

Rnd 11: Ch 1, Sc around and join

Rnd 12: Ch 1, Sc around and join

Rnd 13-16: repeat Rnds 9 – 12

Now, we begin the bill of the hat, which will be worked back and forth rather than around.

Slst over 2 spaces above the center of the fan below it.

Row 17: Ch 3 (counts as first dc) Dc 2 Ch 1 Dc 3 in same stitch (makes first fan)

*Skip 5 Dc 3 Ch 1 Dc 3 in same stitch* Turn. (10 fans)

Slst over to ch1 space in fan.

Row 18: Ch 3 (counts as first dc) Dc 5 in same stitch (makes fan) *skip over to ch1 sp in next fan. Dc 6 in sp. Skip to next fan ch1 space and repeat *. Turn.

Row 19: Ch 2. Sc across. Turn.

Row 20: Ch 2. Sc across. Turn.

Row 21 & 22: Repeat Row 17 & 18

Row 23: Ch 3 (counts as first Dc) Dc across. Turn.

Row 24: Ch 2 (counts as first sc) Sc across. Turn.

Slst over 2 spaces above the center of the fan below it.

Row 25-32: Repeat rows 17-20 twice more.

Now to put on the edging.

Rnd 33: Sc around complete perimeter of bonnet.

Rnd 34: Beginning on middle of fan on the front corner. Ch 3. Dc 9 in same space. Skip sp. Sc. Skip sp. *Dc 10 in sp. Skip sp. Sc. Skip sp.* Repeat * across Join ends of last fan with first fan.

Rnd 35: *Dc, ch2 in sp.* Repeat around and bind off. Done!

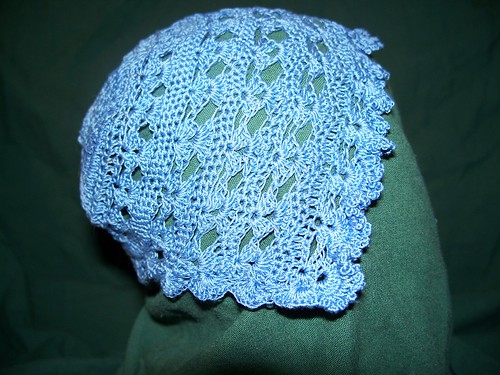
You can thread any color ribbon you want in the Dc in the middle of the brim and through the bottom and front brim shells to secure it the head. Enjoy it as much as I have!


ETA: I've made several bonnets based on this pattern out of various weights of yarn and even different hook sizes, but here are the updated notes on it.

First off, I do not make a circle using rounds 1-16 above. That is the old fashioned way of doing it. I use the current system in which I do the following:

To Begin: Chain 4. Slst join.
Rnd 1: Ch 3, 5 dc in center of circle. Sl st in 3rd ch of ch 3, to join.
Rnd 2: ch 3, 2 dc in ea dc around. Sl st in first dc, to join.
Rnd 3: ch 3, (dc in next dc, 2 dc in next dc) around. Sl st in first dc, to join.
Rnd 4: ch 3, (dc in ea of next 2 dc, 2 dc in next dc) around. Sl st in first dc, to join.

Additional Rnds: For each new round, add 1 extra dc stitch to the number of dc stitches between increases (an increase is done by making 2 dc in one stitch). For example, round 5 would have 3 dc between increases then round 6 would have 4 dc between increases and so on.


After I make the circle large enough to cover the back of the babies head, I start making the fans. My system is to ch3, 2dc, ch, 3dc in the same st, *skip 5, dc3, ch2, dc3 in same st*, and repeat between *'s until there is enough space for two more fans. ch3, turn.

On the way back make a 6dc fan in each ch2 space across making sure to connect the last dc with with the fan tip below it. Ch2, turn.

Crochet two rows of sc.

Repeat the two rows of fans and two rows of sc until it reaches the forehead of the baby.

Now, it's time for the border. Working along the outer edge of the entire bonnet including the front sides and back where there are no fans. I crochet 8 dc fans after every 5 sts. This insures a very ruffly border. Finally, I dc in every stitch around one more time to add more fullness.

Cut tail and weave in.

Monday, May 26, 2008


As I was putting away the Ren clothes for the season, I came upon a gift I received a long time ago.  Being a military brat, I saw my relatives rarely throughout the years. Of all of them, I fondly remember my Great Grandmother on my father's side the most. She had a two story, wrap around porch victorian house on a hill in Illinois. Every time we visited, she greet us with open arms and a huge smile though she was blind from Type I Diabetes and couldn't hardly walk. My family would sleep scattered throughout the rooms at night. I remember that there was a  string that ran the length of the bathroom so she could turn on or off the light no matter where she was. (Being a child, this was really cool to me.)  


Not long before she passed, when I was in High School, I got a package from her in the mail. In it was a quilt that she had made me. At the time I thought it was funny looking, but now I find it beautiful. Though I have never actually used it because she wrote my name on it, and I don't want it to wash off, this quilt is among my prized possessions. Especially since I am now becoming more interested in similar crafts.  So in remembrance of Grandma Foster, here some of her beautiful handiwork as I wish she could have seen it.