Friday, June 19, 2009

Bottle Cap Hot Pad Pattern


Beer Cap Hot Pad
by Dawn L.E. Riden
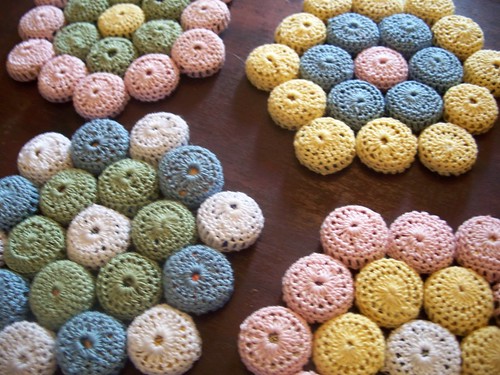


I originally made several of these for a vintage crochet potholder swap. They were such a huge hit, I decided to write down the pattern to share with everyone.


SIZE
6.5 inches across

MATERIALS
Aunt Lydia's Classic Crochet (Size 10); need approximately 75 yards
Size 9/1.40MM crochet hook
19 beer caps of your choice
Sewing needle

GAUGE
24 dc/12 rows = 4" in stockinette stitch

PATTERN NOTES
Ch = Chain
Dc = Double Crochet
Sc = Single Crochet
Sc Dec = Single Crochet Decrease (Insert hook in first stitch indicated, yo, pull up loop, insert hook in second stitch indicated, yo, pull up loop, yo, pull through remaining 3 loops on hook.)
Sl St = Slip Stitch


PATTERN
Cap Cover

Ch 5, slst to first stitch to join.
Ch 3, 15 dc in ring, slst to join at top of ch 3. Make sure to dc over the tail of the chain to hide it. (16 dc)
Ch 2, sc in same st, *1 sc the next three sts, 2 sc in next st*, repeat between * two more times, sc 3, slst with top of Beg ch to join (20 sts)
Ch 2, sc in every st around, slst with top of Beg ch to join. (20 sts)
Ch 3, dc in every st around, slst with top of Beg ch to join. (20 sts)
Insert bottle cap before decreasing. 
Sc Dec around, slst with top of Beg ch to join (10 sts)
Sc dec around, slst with top of Beg ch to join (5 sts)
Break thread and weave through remaining 5 loops, tie closed and weave in ends.

FINISHING

Using scrap crochet cotton, sew 6 cover caps around one central cap on the underneath side where they touch. Then join 12 covered caps around the six. You can mix and match color however you like, so use you imagination!


ABOUT THE DESIGNER
Dawn is an energetic doting mother of 3, loving wife of 1, and friend to many. She enjoys creating unique designs using wire, yarn, and fabrics. To learn more about her and her inspiration, check her out on her blog at: www.dawningdreamsblog.blogspot.com
You can also support her habit by checking out her online store at:
www.dawningdreams.etsy.com


Copyright 2009. Dawn L.E. Riden. hese patterns are for personal and non-profit use only. You may not sell items made from these patterns. You may make them for yourself, as gifts, or for donation to charity sales or auctions. And these patterns love being used for knitalongs or other organized knitting events that are free of charge.

Merchants may not download or print these patterns for sale, free distribution, or class use without prior written permission from the author. If you received one of these patterns directly from a yarn store, or are taking a paid class using one of these patterns, please verify that the store has written permission from the author.
Printing or downloading a pattern constitutes agreement with these terms.

Thursday, April 23, 2009

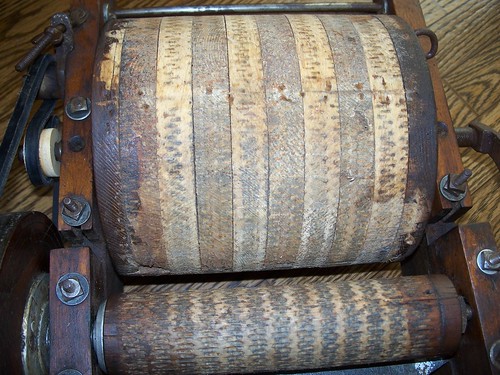
Made Well Co. Vintage Drum Carder


Here she is. My vintage Made Well Drum Carder from Sifton, Manitoba, Canada that I bought from a nice person on Ebay who had purchased it from an antique dealer in Canada. The antique dealer told them that it had been in Newfoundland, and was found in a old barn. I asked around on Ravelry to see if any one has information concerning this beauty. Luckily, my prayers were answered and here's what I learned about it's spinning wheels and such:

Quoted from info I have..Selected Canadian Spinning Wheels in Perspective by Judith Buxton-Keenlyside, 1980:
“The company was started during the depression by John Weselowski, it later became the Make-Well Manufacturing Company and was famous for it hand-operated drum carders as well as it’s wheels. Several of the stylistic features of this wheel were borrowed from the traditional Ukrainian wheels. Wheel and Flyer spindle are arranged vertically. The inner maiden bearing is a hole drilled in the wooden upright. Tensioning is accomplished by raising or lowering a tablet on the outer maiden. Hallmarks of the Spin-Well wheel include a solid drive wheel, pre-cast metal flyer, treadle-system using a fixed treadle bar, footman placement in front of the wheel and provision for extra bobbins.”
Here is a quote from a letter sent to my friend by Florence Feldman-Wood The Spinning Wheel Sleuth where she talks about info on this wheel from a man in Indiana who was in the business of repairing all types of spinning wheels, He states to her:
“These wheels were made in the 60’s and 70’d during the rebirth of the handspinning and weaving crafts. They are well built wheels made of maple and solid core maple plywood. At 27.00 they were prices well below the better New Zealand wheels which sold for 80 to 100 at the time I’ve had two in maple and one in walnut. Paula Simmons used their wheels.”

I also learned from the lady on Ravelry that Mr. Duncan on Duncan Drum Carder told her that this drum carder was the model for for Paula Simmon’s first husband who designed her drum carders as known as Patrick Green's Drum Carders. When you compare the two styles, you can see that they are very similar.


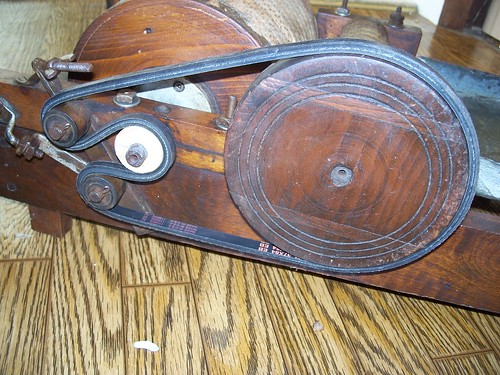
Now, I have not received my drum carding cloth, yet, from Howard Brush Company. As you can see, it is layered wooden wheels that have been glued together, very good construction. If you plan on restoring a carder, like I have, I found this to be the least costly approach. But, I warn you. it will be over $100 to replace worn cloth on both wheels, but compared to $350-$1600, it a steal. I had to replace the belt, as with most vintage carders. I found a lawn mower belt than was nearly the exact size I needed. I simple added a wooden cover to the large drum wheel, and it now works perfectly.

Now, a little disclaimer of sorts, I could be completely wrong, and all the information I have collected be false. I haven't found online sources to support these stories expect what I have been told from numerous people. So, if something here is completely and utterly false, let me know and I can change it. This blog is meant to inform others of the treasures they may also have hidden in their sheds and it's history.

ETA 12/20/2010: Pics of the relatively finished carder with new carding cloth and licker support blocks. Not pretty, but works like a dream.


Tuesday, April 21, 2009

Time for some shop love!

I love the things I make for my Etsy shop. I get to dye, spin, bend, and sculpt to my hearts desire. But with all the items, the one thing I hate is mailing. It can be frustrating at times with deciding how to mail particular package: how much does it weigh? do I add a personal note or gift? what would excite me when I open the mail?

Lately, I've been wrapping all the items in brown paper that I tie off with leftover yarn. It reminds me of the song, "My Favorite things" that Julie Andrews sang in "The Sound of Music". I wonder if anyone gets it when they see it. Oh well, if they don't. But here are some of the things I make. Enjoy!

Etsy: Your place to buy & sell all things handmade
DawningDreams.etsy.com

Wednesday, April 15, 2009

Canning Marmalade

As a military child, I moved around a lot. My mom was my main caretaker, and I love her dearly. But. . . she was not the best of cooks and was crafty at all. I know, ironic huh? My dinner's mainly consisted of blue box mac & cheese and Ramen with Spaghetti sometimes. As I got older, we switched to MacDonald's and Sonic. Safe to say, I had a lot of bad habits to break when I had children.

That was part of the reason I began my degree in Nutrition. I wanted to know how to cook properly and to make casseroles and ice cream from scratch, not a box. I wanted those life skills that I didn't get when I was younger.

So when I visited the store and found strawberries on sale for $1.50 a lb, which is usually up to $5, I snatched up as many as I could without getting in trouble by my husband. : ) I've been working the past two days to can as much for Christmas Gifts. That is the beauty of this process. Not only is it cheaper than buying the 20+ family members each a $10 gift, but it's unique and will be used.


Just so you know, jelly is just made from juice; jam is made from the fruit; and marmalade is made from the fruit and peel.


In all I spent $25 for cans, fruit, pectin, and lids (jars that I'm reusing and cooking pots not included) for 24 jars of Strawberry Lemon Marmalade. That's about $1 a jar! Not to mention that's it's very green by reusing the jars and there are minimal artificial preservatives that are found i mass produced store brands. It tastes much better, too!

I also love knowing that I'm teaching my children that sometimes it is worth it to take the time to make it yourself. Sure, you can go buy jelly, clothes, plants from the store, but cooking, sewing, and growing are more satisfying and give you that feeling of ownership. You'll appreciate everythign more knowing what goes into making an item.

Monday, April 6, 2009

Love for My Fellow Business Women

I had the wonderful pleasure to attend the Norman Medieval Fair this past weekend in Norman, Oklahoma. I actually helped sell bodices from Damsel in this Dress. I have to tell you a little about the wonderful woman who is behind the work.

Michelle, who owns Damsel in this Dress, creates the bodices from her own patterns. It takes great ingenuity, skill, and hard work not only to develop the items, but to also successfully run a business while maintaining the quality. She is constantly tweaking her designs to update and improve them. As a result, her bodices are not only beautiful and eye catching, but study to last years of lacing. Thank you Michelle, if you read this, for the hard work you put into you business.

Also this past week, I visited with my friend Leslie who owns and manages L&B Yarn Co. in Norman, Oklahoma. She and her sister opened their yarn shop a little under 2 years ago now. She is a wonderful person and truly cares about everyone that comes in the store. Her shop reminds my of an old library with shelves and shelves of yarn and goodies that wind back and forth. I haven't visited a yarn store yet that surpasses her selection and warmth of space. If your lucky to stop by, tell her I sent you. Also, in the near future, you will see some of my yarns grace her shelves.

Saturday, March 21, 2009

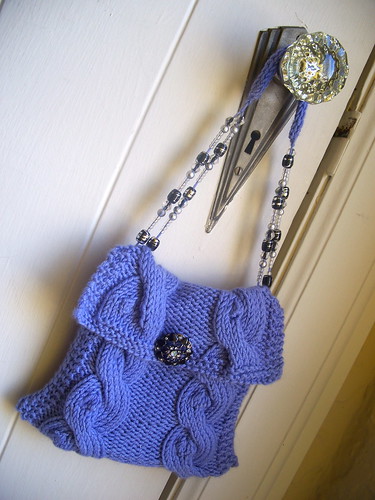
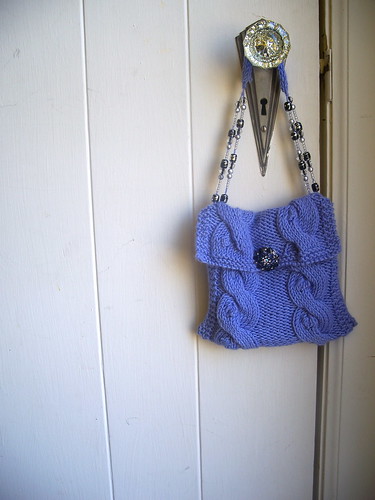
Illustrious Purse Pattern


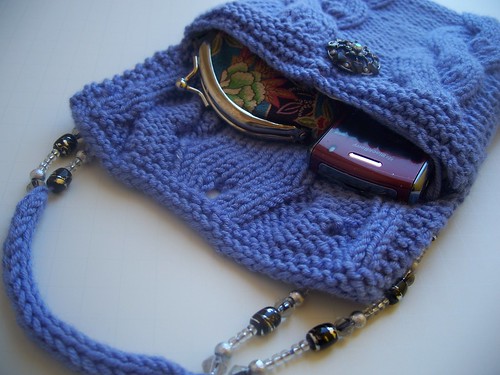
Embellishing handbags to fit your personal style transforms a simple bag into a wearable art. This purse all started with a button. My brother-in-law bought me a beautiful new jacket as a present, and attached along with it, a stunning multifaceted button.

I retain a collection of buttons and beads from numerous sources hidden away in my sewing supplies. They only see the light of day when I open the box to add a new button or a new bead. I could not, however, add this cherished button to the forgotten button stash.

Pulling out a luxurious silk/cashmere yarn, I designed this shoulder bag to showcase the buttons beauty. With its simple rectangular construction and cable/bobble lines, it will easily highlight your treasure as well. Beaded handles add depth, and they are as easy to create as the bag itself. Its beauty can only be enhanced by your imagination!


SIZE
One Size

FINISHED MEASUREMENTS
Width: 6.5 inches
Length: 6.5 inches

MATERIALS
Laines Du Laines Cashsilk [50% merino, 25% silk, 25 % cashmere]; 67yd per 25g skein]; color: Partita; 2 skeins

1 set US 8/5mm straight needles
1 set US 8/5mm double point needles
Cable needle
1 – ¾-inch button
Beads with large center hole (Fashion Glass #3123005 used in photo)
Tapestry Needle
.25 yrds fabric for lining
Sewing needle
Thread to match yarn and lining

GAUGE
24 sts/18 rows = 4" in stockinette stitch

PATTERN NOTES
C10F: sl 5 sts onto the cn and hold in front of work, k5 and, k5 from cn.
Bobble Increase: K into front, then back, then front, then back, then front again of next st: 1 st increased to 5 sts.
Bobble Decrease: P5tog. 5 sts decreased to 1 st.

PATTERN

Bag:
CO 29 sts.

Rows 1-6: K
Row 7: K2, p10, k5 , p10, k2
Row 8: K2, k10, p5, k10, k2
Row 9: K2, p10, k3, YO, k2, p10, k2 (30 stitches)

Beginning on row 3 of following pattern, work 8 pattern repeats.

Pattern:
Row 1: K2, p10, K6, p10, K2
Row 2: P2, K10, p6, K10, p2
Row 3: K2, p10, K6, p10, K2
Row 4: P2, K2, Bbl Inc, K7, p6, K10, p2
Row 5: K2, C10F, K6, K14, p2
Row 6: P2, K2, Bbl Dec, K7, p6, K10, p2
Row 7: K2, p10, K6, p10, K2
Row 8: P2, K10, p6, K10, p2
Row 9: K2, p10, K6, p10, K2
Row 10: P2, K10, p6, K2, Bbl Inc, K7, p2
Row 11: K2, p14, K6, C10F, K2
Row 12: P2, K10, p6, K2, Bbl Dec, K7, P10

Knit 8 rows. BO and weave in ends.


I-cord Handle
CO 4 stitches using double pointed needles. Knit across. Instead of turning, slip the stitches back to the beginning of the needle and knit the row again. As you pull the i-cord straight, the gap on the back will tighten up and close.

Continue in this manner until it is 6 inches. Cut yarn leaving 8-inch tail, and thread the yarn through the stitches and pull firmly.

Cut one 24-inch length of yarn. Thread through the middle of the i-cord. Now you will have an i-cord with two strands of yarn on the ends. Tie a knot to secure the tails to the i-cord.

The beads are packaged on a plastic wire to ensure easy transfer to your project. Simply, tie the bead wire to the yarn, and slide beads from the wire to the yarn handle.


FINISHING
Fold 5 inches of bottom up and seam sides.

Attach the i-cord handle by spreading out the two strands and threading them through the top of the purse and tying a knot. Repeat on other side.

For the lining, cut a 6-inches by 12 inches rectangle from lining fabric. Fold fabric in half lengthwise, and sew 6 inches of each long edge of rectangle, beginning at fold.

Fold over 0.5 inch of the top edges of lining and press. To hide the ends of the handle, slip fabric pocket with wrong sides facing out inside the purse, covering the strap knots and sew around the top. Attach button to front of purse.


Copyright 2009. Dawn L.E. Riden. hese patterns are for personal and non-profit use only. You may not sell items made from these patterns. You may make them for yourself, as gifts, or for donation to charity sales or auctions. And these patterns love being used for knitalongs or other organized knitting events that are free of charge.

Merchants may not download or print these patterns for sale, free distribution, or class use without prior written permission from the author. If you received one of these patterns directly from a yarn store, or are taking a paid class using one of these patterns , please verify that the store has written permission from the author.

Printing or downloading a pattern constitutes agreement with these terms.

Thursday, March 5, 2009

Phat Fiber

In case you haven't known, I've been busy these past couple of weeks getting things together for the Phat Fiber box. I've been spinning and packaging and mailing and everything in between getting everything done in time. February's box was a wonderful collection of fibers, yarns, and other odds and ends that tickled my imagination on the stuff I would like to make. Just in case you missed it, here's my box.


Now, for the first month I will be submitting, I wanted to do something special. I normally wouldn't send in sample that take me so long to make. 45 of them none the less! But I wanted everyone to get something special for the first time. So I made shawl pins that were Celtic themed for everyone.

It took time and patience, and I smashed my fingers a couple of times, but I think everyone will appreciate their treats.

If you would like to purchase one of my creations, you can check my Etsy store out at DawningDreams.Etsy.com.

OR

If you would like to get a Phat Box of your own, you can get it at PhatFiber.Etsy.com.